Coming out of the hole.
Sorry folks – I know it has been a while since the last update. To be frank, I have been in a funk and have had a lot on my plate! Lets bring you up to speed.
On July 28th I passed my perimeter drainage inspection with flying colours. To be honest, it was anti-climatic because he barely looked at the system I was so proud of 🙂 He had a comment something like “the most consciences builder I will ever inspect”.
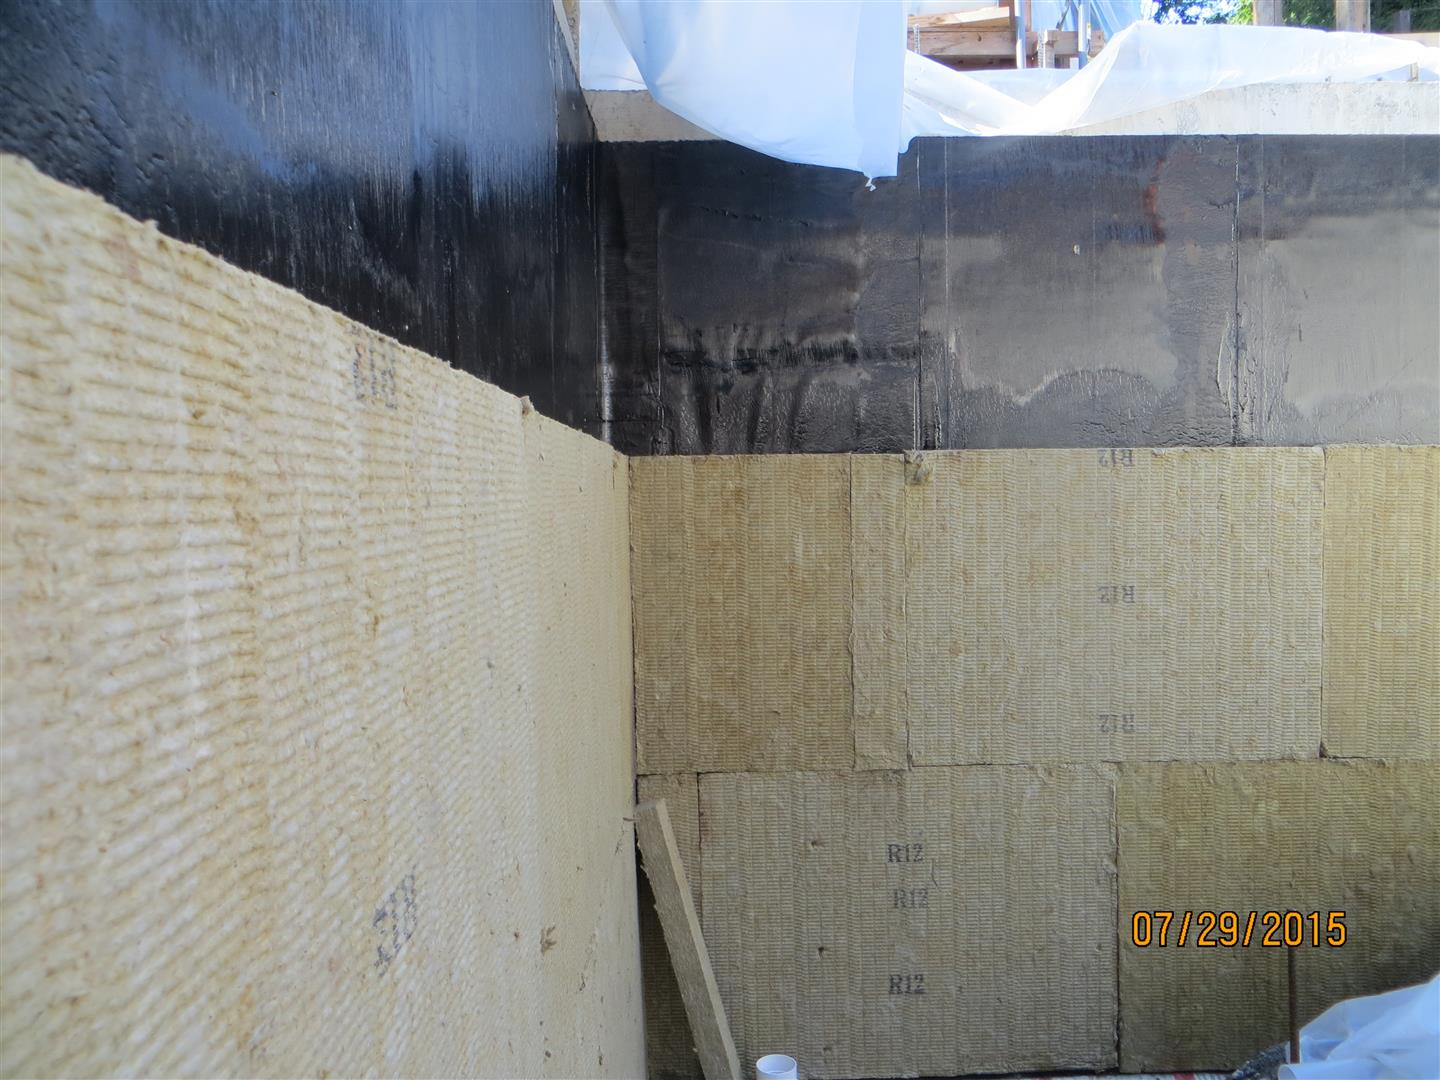
I spent the rest of July and the first few days of Aug on waterproofing and insulation detail. I am attaching ROCKWOOL Comfort-board to the outside of the foundation. But before this step, I had to make sure I was satisfied with the seams of the Colphene Torch’N Stick membrane and also the adhesion of the Sopralene Flam Stick membrane to the Fastfoot Fabric footing form. These systems not only provide the waterproofing of the foundation, they also provide the air barrier for the below grade walls. There was also some final repairs that were needed to the FastFoot fabric. I found that the best method of fixing the fast foot was to gently apply the torch to the back side of the Torch on membrane and let cool slightly and then apply to the footing fabric. I also used the torch and a trowel to seal all of the seams of the torch on membrane. Cory had fused the membrane overlaps well, but I wanted the foundation to be 100% waterproof so took the extra step of sealing the seams as well.
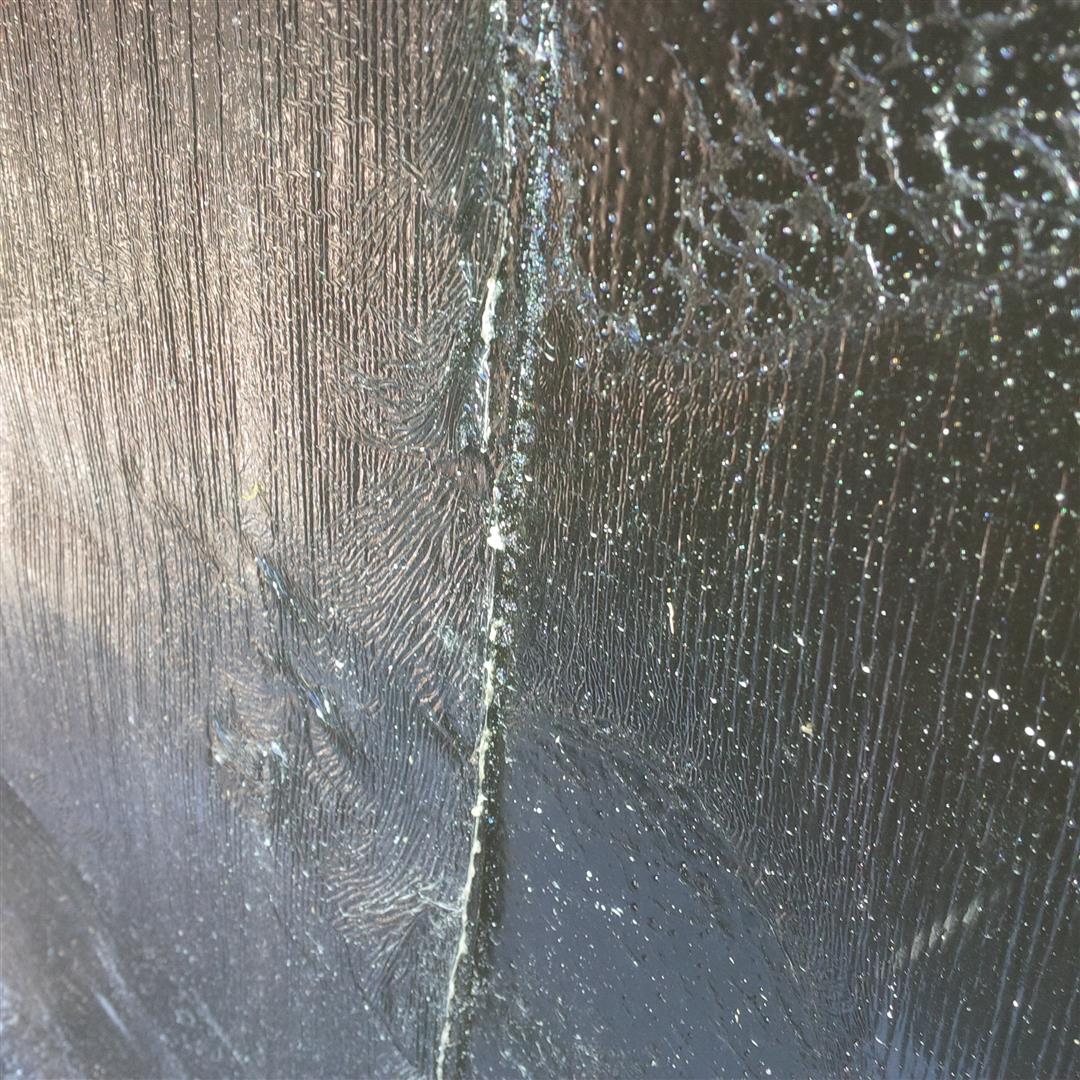

Was the membrane work was completed, I could start work on the insulating. The Torch’N Stick membrane is specifically manufactured so that it has a sticky outside face. When you apply the torch to the surface, you are then able to adhere protection board or insulation directly to the surface.
Edit Feb 9, 2018. If I was doing this again, I would probably just choose a standard torch on membrane (one without the torchable outside surface) if it was any cheaper than the Torch’N Stick membrane and then use Spray Tak from Protecto Wrap to temporarily adhere the ROCKWOOL to the walls till after backfill. This materials was recommended for some ROCKWOOL activities above grade (getting-wrapped-thick-wool-blanket) and has amazing holding power.

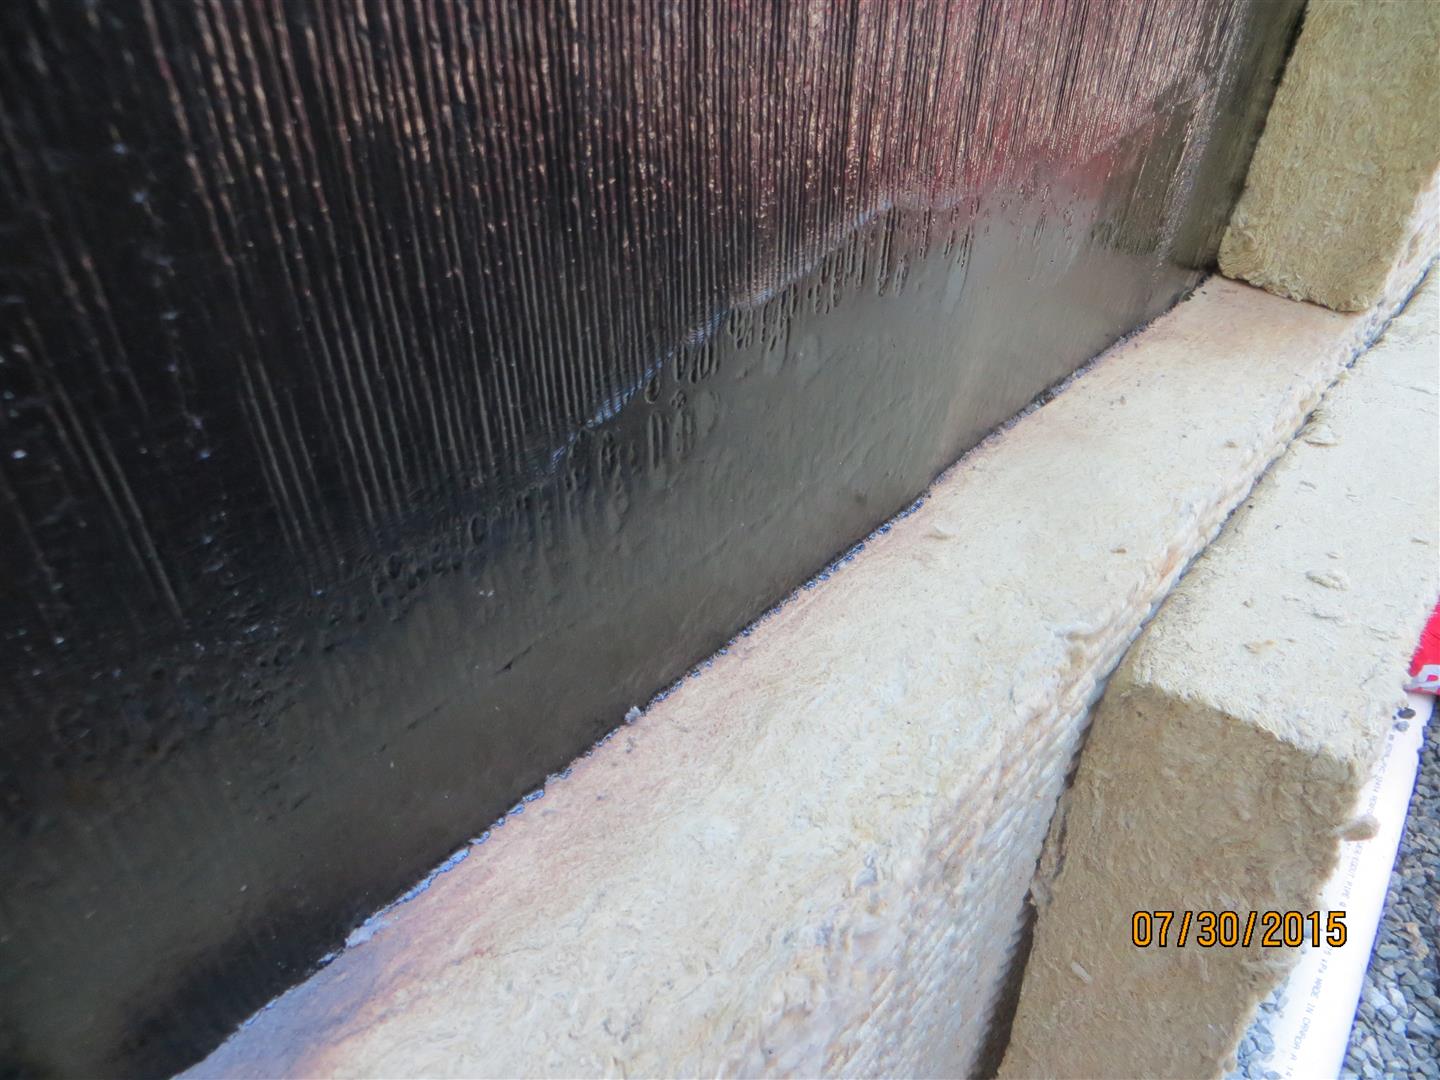
Once the ROCKWOOL was in place, I had to figure out a way of securing the dimple membrane to the ROCKWOOL . In the end, I used a drywall screw type anchor. These were the biggest I could find. Time for the crew at ROCKWOOL to come up with a task specific anchor – Rocky? With both the ROCKWOOL and the dimple, you are only needing to hold in place long enough till you are able to back fill. Normally dimple board is nailed right to the foundation, but this would penetrate the waterproofing membrane, not to mention represent mini-thermal bridges where ever the fasteners were installed.

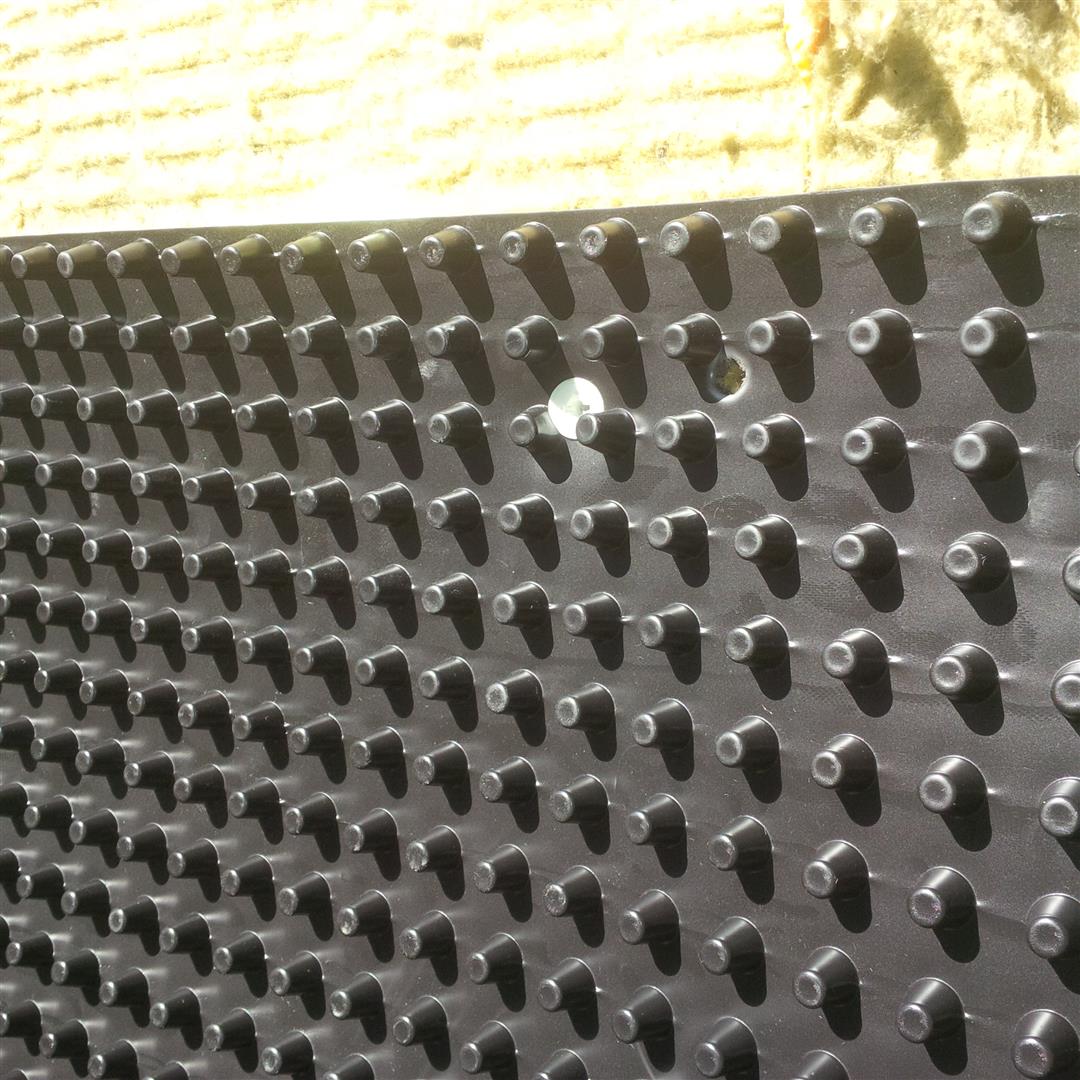
I used DELTA®-DRAIN 6000 HI-X dimple membrane because this was the material that came in 6′ heights (just over half my wall height and a manageable height to work with) at my lumber store and because it was only $0.85/ft2 compared to $1.00/ft2 for the 5′ rolls of Delta MS (a less superior product). The dimple membrane will help protect the ROCKWOOL from damage and keep it very dry.
Outboard of the dimple board will be a gravel column from the footings right to grade (or at least just under the sidewalks). So I placed sheets of plywood about 6″ – 8″ away from the dimple and then ran a sheet of geotextile (Nilex 4551 Non Woven) outboard of the plywood and then back filled against the plywood. The purpose of the geotextile is to prevent fines and other debris from clogging up the granular layer and ensure it remains free draining.

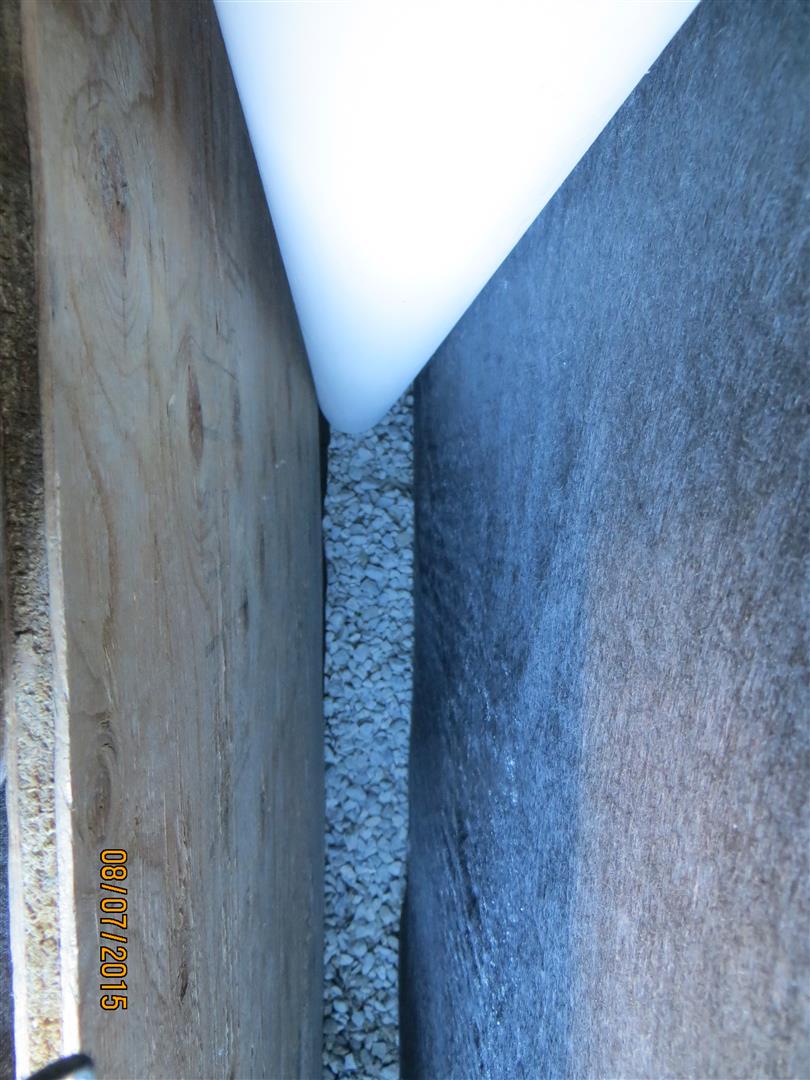
The process is very labour intensive. The back fill must be compacted in 10-12″ lifts, and the gravel and back-fill levels against the plywood can only build up about 8-12″ before you need to pull the plywood upwards. Otherwise there is too much friction on the plywood to raise with just human power. So we are building up about 1 foot of back fill and then compacting while at the same time building up the gravel in the column just higher than the back fill and then pulling up the plywood so that it is just partially embedded (so that you can maintain the same thickness of gravel) and starting the process over and over again. I have hired Aaron from Embers to help me this week to keep the process going.

Why compact? I can honestly say that I have never seen a compactor used during back fill of a residential house and I have probably seen at least 50 houses during the backfill process. The typical backfill involves slopping some bitumen compound onto the concrete (often it is sprayed), and then just dumping the dirt back into the hole. Garbage, large rocks, and all. Sometimes the excavator will attempt to tamp down the soil as he goes, but this is seldom effective. 2-3 days later the backfill is complete and construction progresses. 6 months later the sidewalks are poured. Then I come along 5-10 years later for a Pre-Purchase House inspection and all of the sidewalks are slopping towards the house. The soil settles over time when not back filled and results in a back sloped yard within the critical first 6′ out from the foundation. Now anytime it rains, all the water will pool against your foundation and don’t think they sprayed on goop is going to keep you dry. There is a reason they only call this damp proofing. For me – I will compact every 12″ per my engineer’s advise.
Thanks for visiting.
“Walk with the dreamers, the believers, the courageous, the cheerful, the planners, the doers, the successful people with their heads in the clouds and their feet on the ground. Let their spirit ignite a fire within you to leave this world better than when you found it.”
—Wilferd A. Peterson (1900-1995) Author, Businessman
“Life begins at the end of your comfort zone.” —Neale Donald Walsch (born 1943) Author
“While some may see them as the crazy ones, we see genius. Because the people who are crazy enough to think they can change the world, are the ones who do.” —Apple Computer Inc.
Your site is great — I admire your ability and willingness to experiment in pursuit of the best job that can be done.
How are you planning to finish the basement wall at the top of the Roxul and above it up to your siding? I am building a frame house with WRC siding on a poured basement with 3 feet of basement wall above grade. I can put Roxul either below grade only or up to the siding, and I don’t know which is better. The salesman hasn’t been helpful; he said to leave it below grade and backfill directly against it and on top of its top edge. My builder says to put it all the way up to the siding — would have to cut holes where basement windows are and somehow cover the edges of the Roxul around the windows as well as its surface parallel to the walls. I can’t go as far as you with the dimple layer and gravel column, etc., but want a tidy-looking, water-repellent, durable covering if exposed, and do I need a fines-blocking covering below grade?
Thank you —
@Carolyn Thanks for visiting and commenting. Sorry for the late response. The app used for my comments is got a bug and not notifying me.
It is very important that the insulation continue all the way up the foundation wall and links in with the above grade wall thermal barrier. Any gap would severely diminish the overall walls R-Value, especially of the potion of the foundation above grade is not insulated.
For my assembly I continued the torch on membrane to the top of the foundation stub. I then will lap my self adhered wall sheathing membrane down over the torch on membrane providing the continuity of the air barrier.
The insulation will then continue from below grade to above grade and on up the wall. See https://goo.gl/rwMeBD for a slightly dated representation (I will not be doing the skirt or the outer bump-out layer of insulation below grade.
I will be covering the exterior of the insulation with Hardie panel (cement board) just friction fit between the underside of the flashing above this interface and a rebate I will create in the sidewalk. But I only have 6″ to cover. You will need to figure out a way to mechanically fasten a protection board. The best option I have seen for this in my research is to embed threaded S.S. threaded rod into the foundation (SS is less conductive than carbon steel) using drilled anchors, and then bolting vert furring strips over the threaded rods. Use 3/4 material furring and countersink the end of the rod and nut. You can then screw the protection panel to the furring strips. The threaded rod can by quite small (1/4″ ?) and is spaced 24″ horizontally and vertically.
There are other methods (like covering with wire and applying stucco), but the above seems to be the cleanest looking and easiest/cost effective to install.