Raise the Roof
Well, the last two weeks did not go to plan, what a surprise, but I did manage to finish the basic deck structure.
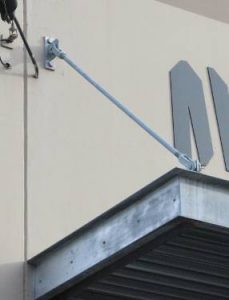
My goal was to build the deck and fully install all of the S.S. hanger system by the time my roof trusses were delivered last Friday. My deck is not cantilevered (because that represents too much of a thermal bridge). Instead I have two built up 2-Ply beams that sits on the top plates of the 1st storey wall (so only two thermal bridges instead of a bridge for each joist). These beams are attached to an outer built up 4-Ply beam that will the be hung from diagonal braces attached to the second floor walls near the top of the wall. The end result will look similar to the following
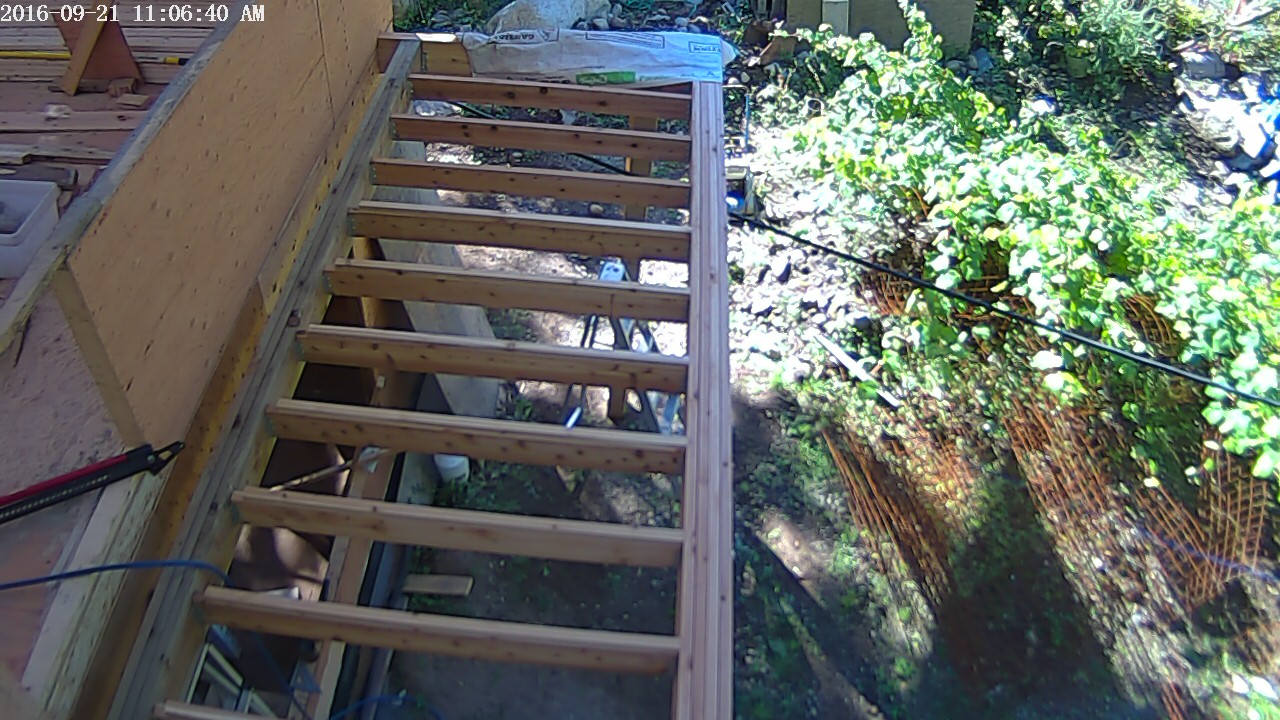
I had the entire structure designed using cedar because I wanted the look of the natural wood and did not want to go the path of a stained or painted pressure treated wood. The other option would have been to clad pressure treated wood with a thin layer of cedar, but this would have complicated the hanger system. I did elect to make the ledger beam pressure treated because it will be easy to hide behind trim work on the house cladding.
Although my engineer had no problems designing for the lesser strength of cedar (hence the outer 4-ply beam), I did find that procuring cedar that was graded was proving very difficult. I contacted several companies that wholesale only cedar products and they all told me that they did not have a product that was suitable, that theirs was only a cosmetic grade. In the end, I ended up buying it from my normal lumber supplier Standard Lumber. This was called #2 or better on the paperwork and the wood looked sound, so I went for it. But there was a certain degree of sticker shock. The wood you see in the below photo was $1000
While I spent several days sourcing the cedar, I was also working on sourcing the custom Stainless Steel hardware that was going to hang both this deck (drawing S8) and the sun shade (Drawing S11) that will be installed on the south elevation. The supply of these components has been a huge issue that is still outstanding. My first roadblock came when I found out my favourite S.S. fabricator, that I had used many times when I used to work at an engineering company as their spare parts buyer, had decided to close shop in 2014 so that the owners could retire. So I send a few emails out to various fabricators I found online. The pricing started to come in and I got my second sticker shock. I was budgeting about $1000 and the lowest price was over $4000. But then I realized that during a engineering change from a tie-rod style of hanger to using a hollow structural steel (HSS) diagonal needed to combat some uplift forces in heavy winds, that I had lost the ability to adjust the length of the hanger to ensure the deck and sun shade sit level. The engineer approved adding a turnbuckle and clevis to the bottom of the HSS, so I got a quote from Portland Bolt and got my third sticker shock and death blow for my plan to use Stainless Steel. Because of the weights involved with the deck, I could not use standard S.S. clevis. It had to be machined out of a block. The total bill would be another $4000, but this time in USD!
So a deck structure that I had budgeted at about $1500-$2000 was going to cost me well over $10K and this was without the deck boards or railing. So, everything is on hold while I wait for my engineer to advise what grade of galvanized metal plate to use. This will not look as nice as S.S., but I will be able to live with it based on the expected significant cost savings. If I do not like teh look, I can clean the metal, and then lightly etch it so that I can apply a primer and top coat in a colour that is suitable for the design.
I also filled in the last two weeks with some addition work on my online hydronics course, meeting with a PV vendor to assess my job site for electrical generation potential from the sun, finalized and released my window order for manufacture, tried unsuccessfully to fully seal the sewn seams in my tarp, and then with great relief, took possession of my roof trusses last Friday.
The relief stems from the fact that at one point the vendor almost cancelled my order. There was a lot of difficulty getting the truss drawings to align with what I actually needed. This resulted in an overworked technician getting frustrated. It was clear that the draftsman that he had given some of the work to, was not actually reading the instructions on my drawings and because I have the clerestory and also a garage that is thermally separated from the main dwelling, my build was not ‘typical’. So assumptions were being made that were not accurate and resulted in the wrong size of many of the trusses. And to make matters worse, I did make some small changes along the way, further adding to the vendor’s aggravation.
But in the end, we worked through the issues and got all of the truss profile drawing matching exactly what was needed. This is critical, because trusses cannot be modified and need to fit perfectly. Mine especially are critical because I have some that are hung from hangers and others that are bearing on their top chord. This means they need to fit perfectly between two fixed points on the constructed walls. This is why most builders do not release the truss package for manufacture until all bearing walls have been constructed and why you often see a delay in construction while the builder waits for the trusses to be completed.
There was also a mild complication with the delivery. All of my crane lifts to date have been with an articulated HIAB, and they had no problems lifting materials under the tarp. But the trusses were delivered using a fixed boom crane. We ended up having to unload from the street into the driveway and then remove the trailer and bring the cab and crane into the driveway and lift up. And even then, we were unable to fully lift the north upper roof trusses on top of the clerestory wall. But they are close enough, and not very heavy, so with a labourer, I should be able to easily layout the package in the upcoming weeks.

As seen above, the office roof trusses are now in place (the space to the left will be filled in with 2×8 ladder framing and some beams to create the overhang). I hope to have all trusses in place and secured by some time next week and then will start the task of adding the furring strips and cross battens to create the air space and min distance from the roof sheathing to insulation surface required by code.
One last note, to those of you that have left comments on my various posts, I am very sorry I have not responded in a timely manner. The application that is used for the comments has a bug and the application developer (Livefyre) has been working on addressing. For now, if you are planning on leaving a comment, please also give me a heads up using the live chat available on the site so I can provide a timely response.
Thanks for visiting.
“Enjoy the little things, for one day you may look back and realize they were the big things.” —Robert Brault (born 1938) American Writer
“Sometimes you will never know the value of a moment until it becomes a memory.”
—Theodor Seuss Geisel (1904-1991) Writer, Cartoonist, Animator
“A pessimist sees the difficulty in every opportunity; an optimist sees the opportunity in every difficulty.” —Sir Winston Churchill (1874-1965) British Statesman, Prime Minister, Author, Nobel Prize Winner