B.A.T. 3.0 and other exciting testing.
Well, my ‘office month’ is coming along nicely. As of this morning I have pretty much finished the bookkeeping and could once again see the surface of my desk. I should get most of the finances and general office organization squared away by early next week and then will start on taxes.
In the meantime I have been following up with vendors and performing some product and assemblies testing.
The first development is with the Big Ass Tarp 3.0 (B.A.T.). Garry at Fraser Valley Tarp is working hard to find options for me that are durable, lightweight, and therefore more economical. He emailed me today advising of a promising fabric so I went up for a shop visit and was not disappointed. He presented a fabric that was almost 2 oz lighter than the 7 oz I used on the last B.A.T. but appeared to be much stronger. The lighter weight was achieved by a looser weave but the strength comes from fibres that are just over 50% larger. I was comfortable enough with the look and feel of the fabric that I went ahead and approved the start of production and should get the new B.A.T. near the end of April.
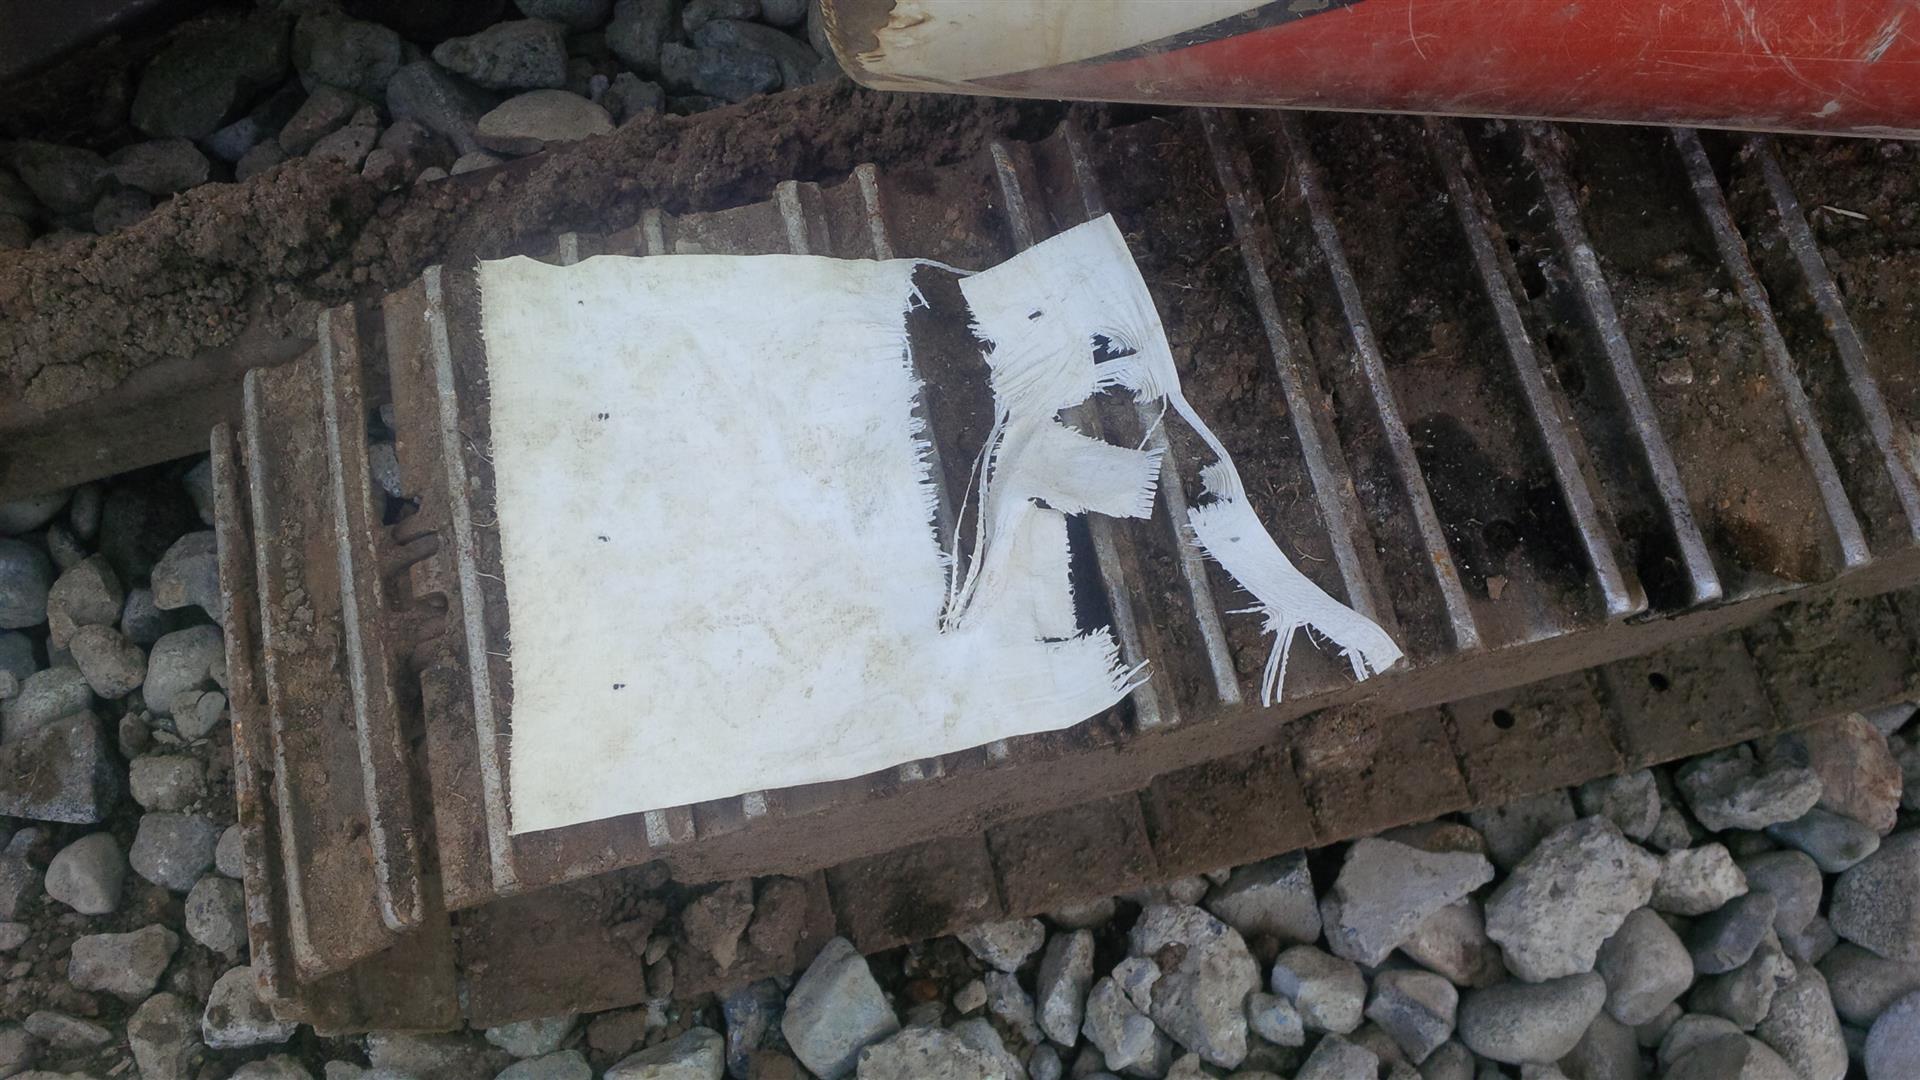
I then took a sample home and torture tested it with Alfie. I clamped each end between 2×4’s and then used Alfie’s boom to try and pull apart. If you listen closely to the below video, you will hear Alfie starting to strain as it is about to pull apart, indicating a significant pull force. And it failed by tearing where the screws were penetrating the fabric. I am confident that if I found a better way to secure the tarp ends, that it would take most of Alfie’s power to pull apart. In contrast, when I tested the fabric from the old tarp, it ripped in multiple locations before I was even able to really load it up and setup my camera.

I now have every confidence that the newly designed B.A.T. will easily hold fast for the next 4-6 months until I complete the structure including roof and achieve the close-up of the basic structure.
As I am getting closer to framing, I also need to decide on a sheathing membrane as I plan to sheath and membrane my walls before raising them. I had planned on a taped seam Tyvek sheathing membrane due to the low cost and durability of the product (I would recommend against Typar as our BCIT testing showed that it was a LOT less permeable and could lead to wall wet-up). I had previously resisted the idea of a self adhered membrane (SAM) due to my perception of installation difficulty, but they make a lot of sense from a building science perspective. A SAM makes it pretty easy to detail an air barrier when compared to taping a non-adhered membrane like Tyvek. They also provide a lot more durability of your air barrier as even small holes or cuts in the SAM would not result in an air leak unless you were unlucky enough to have the damage also occur over a hole/crack/seam in your substrate. Otherwise the substrate would provide the barrier to each side of the damaged membrane.
The other advantage of a SAM is that my planned liquid applied flashing system – R-Guard, would stick well to the SAM where if using Tyvek, I would need to place SAM strips around all penetrations as a transition between the Tyvek and the R-Guard. With SAM, I could just cut out or drill the penetration and then apply the R-Guard liquid flashing system saving both time and money.
So I have started adhesion tests of both the membrane to the plywood substrate and the R-Guard to the membranes.
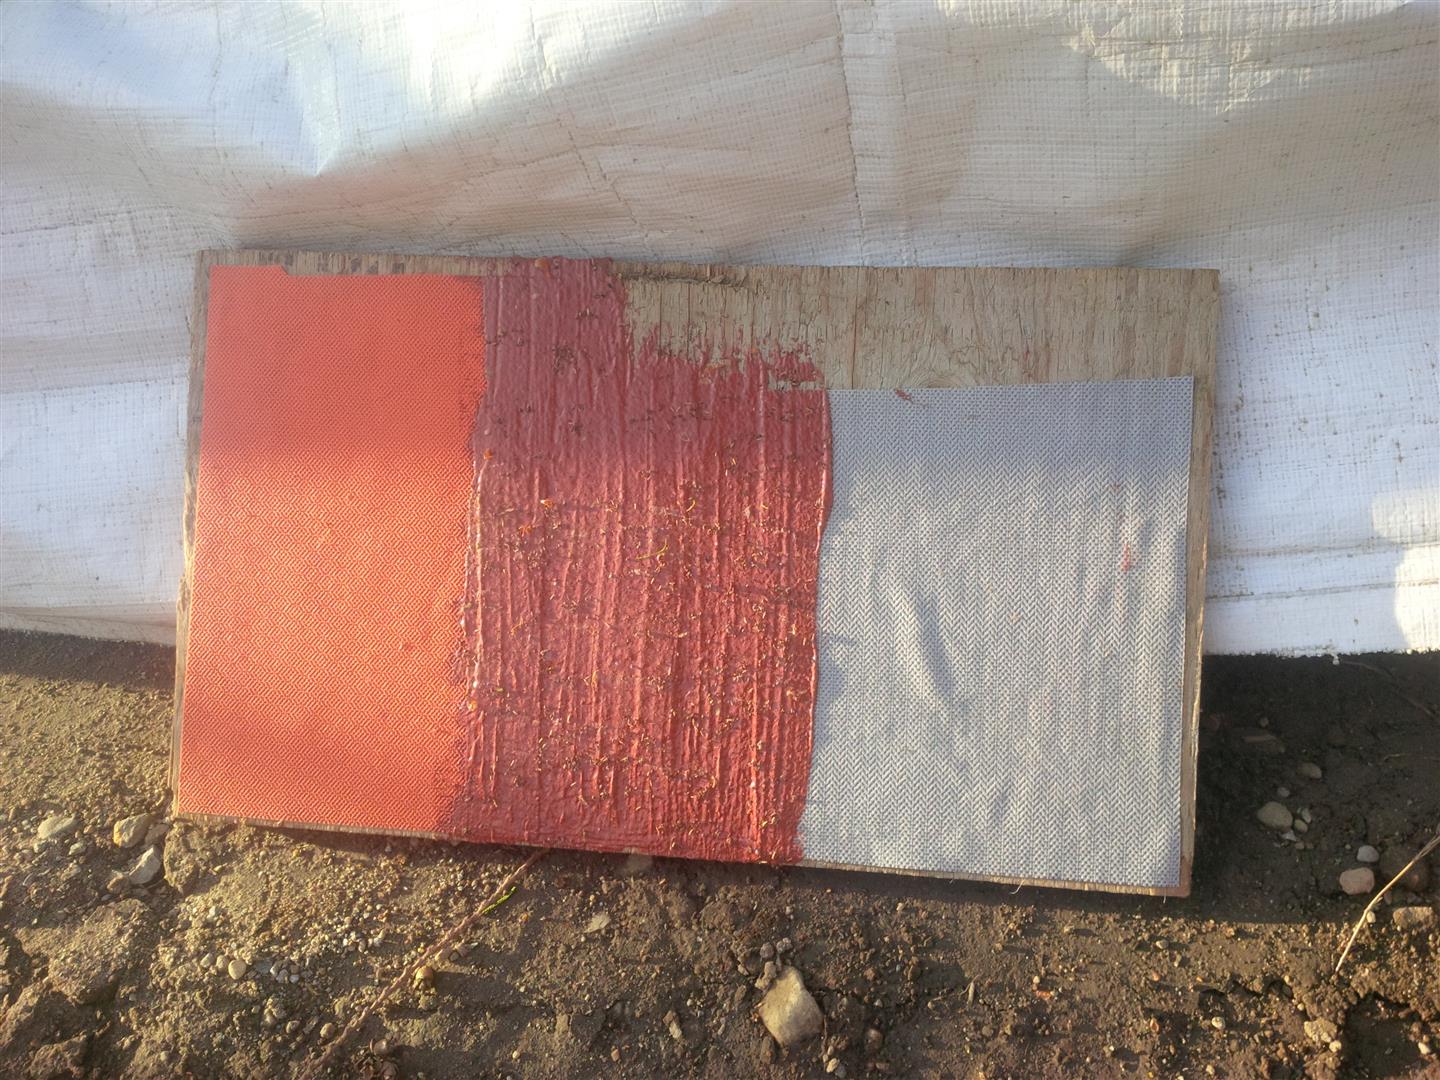
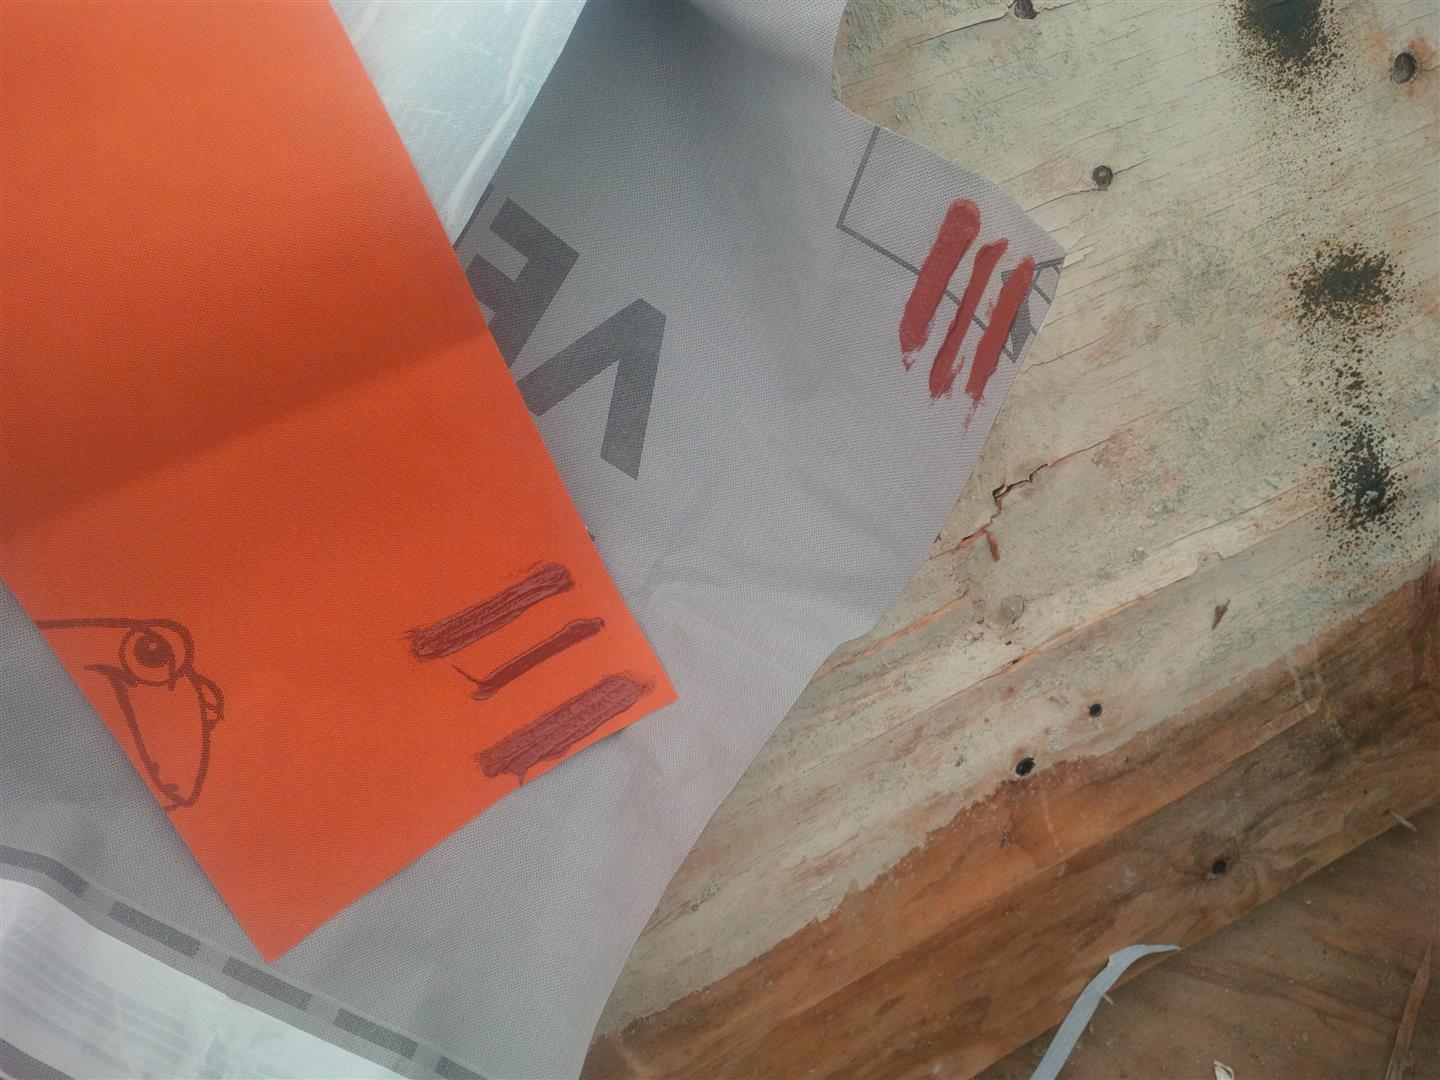
I am testing two of the more promising membranes due to their availability and affordability. The Grey membrane is Delta – Vent SA and has a stated permeability of 30/50 Perms (grains/h/ft²/in Hg) based on which ASTM test is used. The Orange membrane is VaproShield’s WrapShield SA and has a stated vapour permeance of 50 Perms based on yet a third ASTM test (this is one of the problems with relying on ASTM tests by manufacturers). I will let the R-Guard setup about a week and then will try to peel the cured bead of off the membranes. I will do the same for the membranes and test their adhesion to the substrate after about a week in the sun.
I decided against using the R-Guard liquid sheathing membrane that I had previously tested for multiple reasons. My extended testing showed less permeability that I was comfortable with for the field of the wall (8.5 Perms combined with Plywood substrate – strait plywood was 17 Perms showing a significant drop in assemblies permeance). It is also quite pricey when compared to a normal sheathing membrane. But the biggest stumbling block is that it does not have a CCMC evaluation of the product, and therefore cannot be directly used under Part 9 construction. Instead it would need the sign-off of a building envelope engineer further adding to the cost.
This month also encompasses two trips out of town.
Last weekend was a long weekend in Palm Springs as I accompanied my wife to attend her firm’s business retreat. While I enjoyed my first experience on an ATV (2 hour desert run), I found the location to be severely wanting. They have had a fairly sever drought for most of the last decade, but water conservation although talked about, is no where to be seen. The resorts grounds are watered nightly with sprinklers, the toilets and showers were not low flow, our resort had something like 25+ pools, and the most unbelievable fact was that they have an enormous field (looked to be 40+ acres) that is watered grass that will be used as a parking lot for upcoming tennis tournaments at their ‘world famous’ tennis club.
But of course there were signs in the room asking us to conserve water and how dire the situation was – Go Figure. 🙁
What was nice to see, was the use of wind farms. I was never able to find accurate stats of how much power was being generated, but the multi-height towers always had the vast majority of units spinning on the multiple times observed.

This weekend I am also flying up to Penticton to visit Joe and Jean who used to be my neighbours growing up on 6rd in Richmond. Joe has advanced Parkinson’s and possibly also Alzheimer’s, so my opportunities to visit with him are rapidly diminishing and it has been way too long since my last visit.
On my return I will polish off the financial tasks and then switch gears to the AutoCad model bringing it up to date and planning the final stud layout for both floors. I then need to create my material takeoff and get delivery of the first floor materials lined up. Also need to have Sean from Burley Boys back to rig some tarp anchors on one of the trees and while on site do some more limbing of the Cedars I kept at the south side of the house but still want to receive winter sun through.
Thanks for visiting.