Ducks in row - Finally!
I have now progressed far enough on finalizing design and sourcing materials that I will be able to physically start work at the job-site this week. Last week involved finishing off the cladding design and a series of vendor visits to pick up the following:
- 3/4″ x 2.5″ x 8′ Pressure Treated Furring strips. I was looking for 3″ wide strips to make it easier to keep the plane of the furring strip face even, but have been assured that the 2.5″ will work with a little bit more effort. The 3″ are a special order where I would need to order a minimum qty of 640 pcs at $3.45 ea. I was able to find the 250 pcs I need, in a 2.5″ wide configuration, from Poco Building Supplies for $2.02 ea (was old stock purchased before the plywood prices shot up).
- Flashing Package. I finalized and ordered my flashing package from Eagle Sheet Metal in South Vancouver. They are a small family run shop that do fabrication (and installation if needed). They had excellent service and a fast turn around. Their pricing was comparable to the other recommended flashing shop but they were more accommodating in being able to also fabricate the stainless profiles. Thanks to Alana for processing and turning my order around quickly. I have 8 flashing profiles with five of them in 24 ga. Kynar Dark Bronze and three profiles in Stainless Steel.
The Kynar material is a much better finish than the standard you typically see at the lumber shops. This finish along with heavier 24 ga. will allow these flashings to stand up well to decades of UV exposure and outdoor rigours. The stainless profiles are per 2, 4, & 5/A15 details on the A15 Flashing Summary drawing.
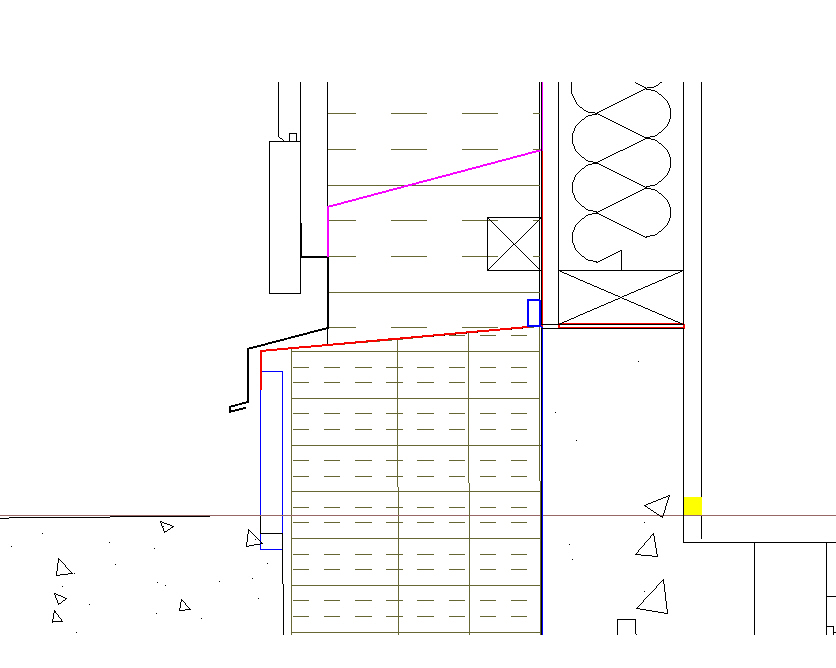
2/A15 is a cross cavity clip that will attach to the wall exterior sheathing and contain the top end of the cement protection board I will have at base of wall that protects the foundation insulation that projects above grade. I chose stainless for this profile to reduce the thermal bridge it represents (conductive path through insulation layer). I will reduce this bridging further by sandwiching a 10mm areogel insulation strip by Proloft between the clip and the sheathing. This 10mm strip represents an amazing R4 thermal resistance. The strips can be purchased from Convoy Supply in Surrey location for $9.71 per 56″ long x 1.5″ strip. I needed 3/4″ strips, and the manufacturer had recommended using an angle grinder with cutoff wheel, but this just made a mess. The best method was to just use a straight edge and a construction snap blade to easily cut through the material. The areogel is encapsulated in a rigid shrink wrap. This is of course compromised if you cut in half. So I just re-wraped the cut strips in some Tyvek sheathing membrane tape. The encapsulation is to keep as much of the micro bubbles as possible contained within the fibreglass substrate.
Profile 4/A15 is a perforated stainless and will provide the bug screen at the top and bottom of the rain screen gaps (much more durable and attractive than the plastic mesh you buy at the lumber stores, also much easier to install). Profile 5/A15 will provide the bug screen and integrated wind clips (by locking into hem of Kynar flashing) for window sills, heads, and second storey base of wall locations.
I have all flashing and proloft on site now and will start installation this coming week. I did some test flashing s-seams last week and have realized I am not very good at making these look neat, especially with the heavier 24 gauge material. I had planned on hiring Geoff Kirkpatrick from RDH to come and fabricate my standing seam corners anyway, and will now have him also fab the s-joints in the more visible base of first wall locations. Hopefully with his guidance, I will be able to make the more remote upper floor seams look good enough from grade.
- HRV 2.0 radius special order elbows. I have picked up a sample of the 7″ 90 and 45 custom elbows and will work during some evenings over the next week or so to ensure their much longer length fits into all of the tight spots I have with my HRV duct routing. They come with a hefty price tag with each 7″ 90 coming in at $46 each from Ecco heating products. For my system, this works out to $2700 + tax for just the 45 & 90 elbows. The main fittings and pipe are another $1500. And my HRV unit itself will probably come in around the $3K mark. But this is still well below the reported costs of the proprietary systems used by Zehnder and other high efficiency systems. With the large diameter ducts and the gentle 2.0 radius bends, I should have very low pressure drops throughout the system leading to increased comfort and reduced energy costs.
- Cladding – I have now finalized the cladding design including feature walls that we will place at the front of the building.
I am still working towards sourcing the cedar from Coulson. They have given me some great pricing but the engineered siding is still a lot more expensive than the solid cedar material. However, the engineered product is reported to be more stable and less prone to cracking and twisting/warping. I have priced out the finalized cedar takeoff at $16,400 (Coulson can provide the following lengths: 2′, 3′, 4′, 5′, 6′, 7′, 8′, 10′, 12′, 14′, & 16′ – the 16′ will have one seam within its length). It is much cheaper to buy in the lengths needed than to say buy it all as 16′ stock and cut on site as needed. I spent a couple of days planning out the cut list to come up with the exact sizes needed around the dwelling. I also bought a sample board from Dicks Lumber (who sell it but at MUCH higher prices) and am testing various stain applications for the desired finished look. We want to preserve the richness of the cedar and not let it ‘grey’ but at the same time, want to try and blend some of the variability found in the grain colouring of even one strip.
We are looking at mitred corners at window penetrations and outside building corners. Yes I know, mitred corners have a history of opening up. But that is typically with solid cedar strips. I am hoping that the engineered material would hold up much better and we will also use exterior adhesive and pins to lock in place. We will still have a fallback down the road of adding some trim over top of the mitred seams if they do nor perform well and I will also line the corners behind with flashing to prevent water ingress.
For the feature walls we will look at a cement board panels. Currently the front runner is the Illumination Series from Nichiha. These are a thicker panel than the standard Hardie and seem to have a better selection of colour matched trims. The physical appearance of the product also looks more high end compared to Hardie and the Illumination series allows you to colour match to ANY paint chip colour. We are looking at a darker cool grey to offset the warmer red tones of the cedar. I have looked at the ‘more sustainable’ panels made from compressed paper fibres, but my research has indicated the colour fastness of the product is questionable. It is also a LOT more expensive than the cement board alternative. In the end, this is going on a fairly small percentage of the house, so if the product does not work out, we can replace with something different down the line.
I will post some photos as I start installing the exterior insulation and cladding and also of the custom elbows in the next week or so. I am also going to do my best to start updating the photo gallery on the site. Sorry folks, just been too busy and tired. I will get to it. As far as the main project details under the project design tab of the site. I am afraid that most of this will not get updated till the end of the project when I have a lot more time to illustrate the various assemblies and write up their descriptions. In the meantime, if you have a question, please just ask and I will be happy to provide more details.
Thanks for visiting!
“Success is not just the crowning moment, the spiking of the ball in the end zone or the raising of the flag on the summit. It is the whole process of reaching for a goal and, sometimes, it begins with failure.” —Erik Weihenmayer (born 1968)
“Life isn’t about waiting for the storm to pass. It’s about learning how to dance in the rain.”
—Vivian Greene Author, Motivational Speaker
“Tell me and I forget. Teach me and I remember. Involve me and I learn.” —Benjamin Franklin (1706-1790) Politician, Writer, Scientist
“You may have to fight a battle more than once to win it.” —Margaret Thatcher (born 1925) Former Prime Minister Of The Uk
“Stay committed to your decisions, but stay flexible in your approach.” —Tom Robbins (born 1936) Novelist, Short Story Writer, Essayist