The Barriers
No, I am not talking about some 70’s alternative music group, but the various components that allow for the separation of conditioned indoor space and non-conditioned outdoor space in a building. These barriers create the envelope or more appropriately named Enclosure of a building. After my recent update identifying a resolution of the difficulties I was having with my Enclosure and the Municipality, I thought I would follow up with a more in-depth discussion of the barriers and their purpose.
There are 5 barriers employed in most building enclosures;
The first defined barrier is the water shedding surface (WSS). The code describes this as a ‘Primary Plane of Protection’. Its purpose is to deflect the vast majority of storm water away from a building. This is also the only visible barrier, in that it is made up of the cladding, windows & doors, flashings, and roof. This barrier is often not 100% continuous , and it is expected that some liquid water can penetrate through this plane (except low slope roofs which have a 100% water tight WSS). The materials of this barrier are not important as long as they are able to shed water and are not adversely effected by wetting.
The second barrier is the Water Resistant Barrier (WRB), also sometimes called the Weather Resistant Barrier. Its purpose if to provide the last line of defence against water penetration into the assembly and is called the ‘Secondary Plane of Protection’ by the building code. For walls, it is most typically a type of sheathing membrane in residential construction. Any materials located outside of this barrier should be chosen that are not adversely effected by wetting. This barrier is expected to be continuous and not allow ANY penetration of liquid water past its defence. This does not mean it has to be air sealed, only shingled in a way to shed water. What is important is that the materials of the barrier are generally vapour open in a heating dominated climate (different rules apply to hot or mixed climates and are outside this author’s focus). Like Gore Tex, you want this layer to be water tight but allow perspiration to escape. The allows any build-up of humidity within the assembly to bleed out to the exterior low pressure side of the assembly. This is also why, for a durable assembly with the maximum built in safety factor, you only want a vapour open insulation when installing insulation exterior to the WRB.
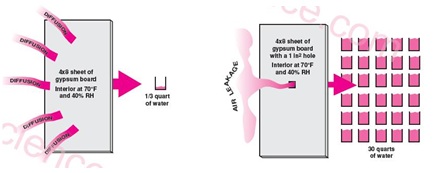
The next barrier is the Vapour Barrier (VB). Its function is to prevent moisture, in the form of vapour, from entering the assembly through diffusion (think cell to cell movement) and then condensing on cold surfaces within the assembly possibly leading to rot or mould. This barrier only needs to stop diffusion and as diffusion is a slow process moving small amounts of moisture, pretty good is good enough. A VB that covers 90% of the wall, will still make a very effective barrier – there is no need to seal your VB around penetrations and make air tight. Leave that for the air barrier! A VB should ONLY be installed on the warm side of an assembly (high vapour pressure side). Materials selected for this barrier are again flexible as long as they are generally vapour tight. For Canada this is on the inside of the assembly and has typically been detailed as a poly sheet installed beneath the drywall. But you could also use Vapour Barrier Paint which is a bit more permeable than poly and offers some additional safeties to the assembly as it allows some drying inward if there was a failure somewhere leading to very high moisture levels within the assembly.
The last barrier is the air barrier which, in Canada as a whole, has never been taken seriously by the building codes and construction community, but is one of the most important barriers from an energy efficiency and assembly durability standpoint. Its purpose is to block air movement through an assembly. Air movement, when it exists, can bring with it vast amounts of moisture, in vapour form, into the assembly where again, it can condense on cold surfaces possibly leading to rot or mould. The beauty of the air barrier is that its location is flexible. It can be installed at any point within the assembly and will still prevent air movement THROUGH the assembly. But while it is flexible as to its location, it MUST be continuous in all planes to be effective. This does not mean it is one material, but rather a group of materials all linked together in a continuous air tight fashion.
In the vast majority of single family constructions in British Columbia, over the last couple of decades, the air and vapour barrier have been combined utilizing a ‘sealed’ poly sheet installed beneath the drywall. Futile attempts have been made, over and over, and over again, to seal this poly sheet in a lasting manner as an effective air barrier. In my previous profession as a home inspector, I never once saw an effective poly air barrier. It is just too difficult to seal a poly sheet around the myriad of penetrations through the outside walls and ceilings. My recent video on sealing HRV ducting demonstrated how difficult it was to even seal the end of a metal duct for testing with red tuk tape. Imaging trying to seal around every wire, plumbing pipe, gas pipe, cable vision/alarm/telephone wire, air duct, etc, penetration not to mention around floor trusses and other awkward structures throughout the whole building. GOOD LUCK!
The effectiveness of the air barrier has never really mattered in Canada because until the most current code iteration, the language of the code has required an ‘air barrier’, but has never required the testing to confirm a barrier is present. Now that the codes are finally taking this seriously, builders are left flummoxed as one after the other fails their air tightness testing. One of my friends at RDH spends many of his Saturdays at a small warehouse in South Vancouver, educating builders on the proper installation and execution of an air barrier for builders in Vancouver that have failed their air seal inspection.
Now that the code in the rest of the Province will also require air barrier testing, it will most likely result in a change in strategy by the build community and adoption of the exterior air barrier approach preached by many in the Building Science Community. In this approach, the air barrier and the WRB are instead combined to create the air barrier on the exterior side of the sheathing. At this location, you only need to worry about sealing the sheathing membrane to itself and around the perimeter of penetrations like windows and doors. But the penetrations themselves are already sealed to be water tight, so now you are only talking about the addition of sealing the sheathing membrane seams. Unlike trying to seal poly around irregular shapes, it is much easier to seal straight long seams between membrane courses. And if you use a self adhering membrane, like Delta Vent SA, this process becomes even easier.
The only caution expressed by proponents of an interior air barrier, is the risk of air movement into and out of the assembly from floor to floor (air moves from interior into wall and then back into the interior on another floor), but a dense stud cavity insulation all but eliminates this risk (mineral wool or dense packed cellulose). This risk is also typically quite low as it requires a pressure difference to initiate an air flow. This would typically only be present in homes with a significant temperature variance between floors (something not recommended in a high performance home). While we are discussing the stud cavity, utilizing a dense insulation also prevents convection currents occurring within the cavities, a process that can bleed energy away as it picks up heat from the drywall surface and loops it over to the sheathing’s surface where it is lost by conduction.
In the past, the correct detailing of many of these barriers was not as important, because as we did not insulate our buildings to any great degree, heat loss from the interior of the building could often cook out any moisture accumulation within the assembly. But as we increase the insulation levels in our assemblies, we now increase the temperature differential within them, and our exterior sheathing becomes colder and colder as they loose the ability to be heated by energy escaping the interior of the structure. A colder sheathing will more often be at or below the dew point of any interior air escaping into the assembly.
As we strive for ever more efficient buildings and ramp up the insulation levels of these assemblies, it becomes critical to get these barriers right if we are to prevent widespread failure of our building stock. We need to start doing things better!
Thanks for visiting and as always, I look forward to any comments you may have.