Working through Hydronic Panels and Completing HVAC equipment installation
As promised, I am creating some back posts, to show work that was done, but not yet documented in the progress journal, or on YouTube. Forgive me if I slip between present and past tense during these ‘post’ updates. I will also try to tie in past posts and videos, to provide continuity to the post’s subject.
This post will cover the continued installation of the hydronic ceiling space conditioning panels. But first, lets review.
Back in October of 2020, I discussed why we chose the ThermoFin U transfer plates.
They are just a much better quality plate, compared to anything else I have seen on the market.
Then in December of 2020, I showed you the completed installation of the first hydronic circuit.
We can now skip forward to Feb 7, 2021 and show a new site visit. At this stage we were close to the end of the ceiling panel installation and only had the living room panel left to install.
You can see the finished living room ceiling layout briefly in the below video. I am also discussing the accuracy, needed by the drywall boarding team, to ensure that the hydronic tubing is not punctured during drywall installation. (Also see Time Code 17:48 on the below video for the finished drywall cover.)
This accuracy cost $$$. This is a hidden cost of hydronic ceiling panels. The boarders stated it took at least 300% more time, compared to a normal ceiling. Part of this, is the need to measure the screw pattern from the ceiling and transfer to the drywall sheets, but with the need to also use 2-1/2″ screws (needed to penetrate fully into the OSB ceiling sub-base and pull the drywall tight to the transfer plates), they were not able to use the standard guns that drive collated screw strips. So, each screw had to be picked up, and held in place to drive home.
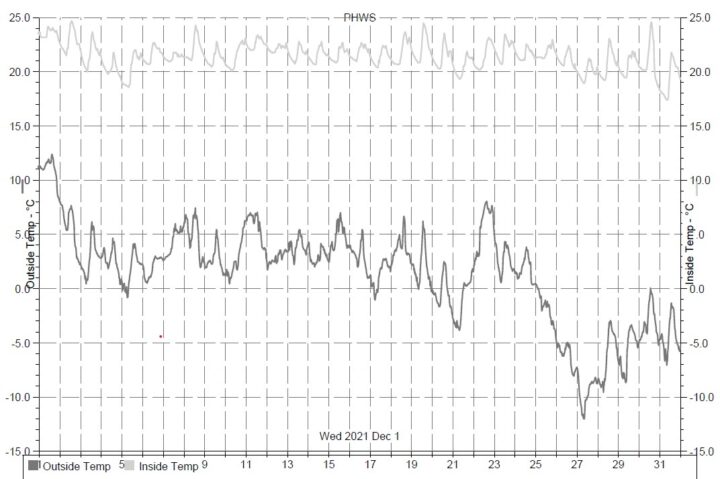
The installation of the drywall marked the end of what I would be installing on the space conditioning system, until after we moved in. In fact, we went through an entire winter without an active HVAC system. We were able to easily manage using only a single 15A electric resistance heater on each of the main floors and a 30A 220V construction heater in the basement (the later of which only needed to fire on very cold days). The below graphic from November 2021 shows, even with outside temperatures down to -12C (10.4F), the interior of the home seldon dropped below 20C (68F).
Have I mentioned how phenomenal and comfortable the building envelope is on this dwelling!!!
In October of 2021, I started to install the actual HVAC equipment and instrumentation.
The majority of the equipment was installed by December 20, 2021.
Finally, in early March 2022 (still recovering from 2.5 months of laryngitis), we were ready to energize the GREE heat pump and charge the lineset, to finally start the system up.
The next three videos document that process as well as some preliminary coding of the HVAC control system in ControlCore Pro.
Once again, many thanks to Benoit at ThermAtlantic, for the continued assistance during the installation of this system!!!
Fast forward to Aug 2023, and I can say that the system has been AWESOME!!!
I have never been in a more comfortable building. Because the whole system is radiant, all of the surfaces around you are either being heated, or the heat is extracted from them in cooling mode. This produces a very stable and tight average surface temperature of objects around you. You especially notice this in the summer. You walk into the dwelling, and it feels like a soft cool blanket envelopes you to provide instant comfort. There isn’t cold air flowing with pockets warmer than others, there is just an even gentle feeling of immediate comfort.
I can also 100% confirm there are no problems with condensation, while cooling with hydronic ceilings, as long as you are intelligent with the installation and instal the relevant controls and sensors needed to continually monitor the dewpoint of the interior air. You would need to do this with any space conditioning system.
In the case of Hydronic systems, just ensure that the water temp you are providing to the system is above the dewpoint of the interior air.
Pretty basic – right?
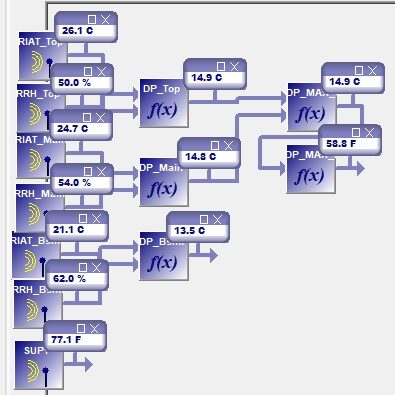
For us, this means a temp/humidity sensor on each floor, and a little bit of code that calculates the highest dew-point across all floors. In the below example, the highest DP is on the top floor (14.9C). So we ensure the chilled supply water is newer lower than the highest DP + 2 (safety margin). Technically, you need the barometric pressure to accurately calculate a dew-point, however the following formula is more than accurate enough for the needs of a hydronic system.
DP = (237.3*( log(RH%/100)+((17.269*IAT)/(237.3+IAT)))) / (17.269- (log(RH%/100)+((17.269*IAT)/(237.3+IAT)))) where IAT – Indoor Air Temperature and RH% – Relative Humidity % (Sorry, I do not remember where I found the above formula, but it works! Original formula used exp, but this is un-available in ControlCore, so I had to re-work it to use log)
Since installation, I have spent some time with the ControlCore Pro code to even out the systems water temps, but I have ideas for a lot more functionality once my brain decides to join the party again. 1-1/2 years in from getting sick in Dec 2021, and I am still battling chronic fatigue and what I call ‘mushy’ brain, I just don’t have the horsepower to wrap my mind around anything complex yet.
Most of the added functionality I want, relates to the transitions between heating and cooling, and heating days where there is also a lot of solar gain. I want to allow the system to coast the temp down or up in the buffer tank, depending on what the following days outside temperatures and cloud cover will be. Fortunately, ControlCore PRO does have a weather block that is able to provide some of this information. I just need a clear head to think of all the permutations needed in the code to generally automate this process. For now, we are switching the system manually between heating, coasting, and cooling. In the end, I may need a second small buffer tank that would be maintained as chilled in the winter and heated in the summer, to handle some of the cycles we experience in our region. Even in early summer, we can experience a 15 degree spread between daytime and nighttime temperatures. In winter, this spread can be much higher inside the dwelling, due to solar gain. On a sunny winter day where it can be below 0C (32F) outside, it can rise to 26C (79F) inside some of the southern rooms.
SO, care must be taken to ensure an efficient use of the heat pump (don’t want to constantly heat chilled-water or chill heated-water), but still maintain occupant comfort.
On a side note, I can confirm that there generally have been no ‘clicking’ sounds made by the PEX A. There was general concern in the industry that, due to temperature changes, the pex tubing would shift within the transfer plates and emit a clicking sound. On very rare occasions, where I have switched the system between full heat, let it coast, and then introduced full chilled water in the system on a cooling cycle, there has been one set of clicks heard in a couple of the rooms. Each loop in succession emits a click sound. So you hear say 10 clicks in succession if that is the number of loops in the room, and then it is quiet again. Therefore, the lack of ‘expansion zones’ is definitely not a problem when using ThermoFin U transfer plates as predicted by Radiant Design and Supply.
In addition to the above automation programing, i will need to spend a fair bit of time wrapping my head around the data collected from the various instrumentation, so that we can publish some form of BTU output data for the as-installed system.
That wraps up the current progress on the overall HVAC system. I will document the actual installation of a ceiling panel, when I install the panels in the basement wood-shop (most likely winter 2024-2025) . I will also utilize multiple manufactures’ heat transfer panels in this room, so that we can provide some thermal images looking at the varied performance between the different plates.
I also hope to produce a video showing; the adaptability of ControlCore Pro, Energy use vs BTU output of our hydronic system, and the tuning of a PID controller.
I want to thank you for your support and patience during the last 24+ months, as I have worked through so many different issues, that life has thrown my way.
Thanks for visiting!
“Failure cannot cope with persistence.” — Napoleon Hill (1883-1970) Motivational Author
“Self-care is not self-indulgence, it is self-preservation.” — Audre Lorde (1934-1992) Writer, Poet, And Activist