Finally!
Finally! This sums up my thoughts of the moment and covers a wide array of topics this year.
Finally: On June 8, I finished the installation of the roofing insulation package and Ceiling OSB air and Vapour barrier. This significantly closed up the dwelling and will finally keep the birds out!
Finally: On July 18, I finally completed the last of the Coulson engineered cedar siding installation (save for a handful of trim pieces around the top of the first floor windows). Most was complete in 2018, but it still felt like a milestone for 2019, to complete the majority of the unfinished window returns from last year and complete the final staining of the south, north elevations and second to last coat on the east elevation. This took an extraordinary amount of effort to install this siding with much of the pain self induced. The part I could not help was the difficulty installing the rain-screen furring strips over 6” of exterior mineral wool insulation. This was aided by jigs, installation sequencing, and lots of patience.
If I was doing this again, I would have elected to go with the option of ¾” exterior wall sheathing instead of ½”. This would have allowed me to place the furring strips at any location along the wall and not worrying about getting them fastened through the insulation and into the studs. The part that was self induced was my desire for a nice clean installation of the siding meaning no trim boards around windows, doors, and wall corners. I instead elected to mitre each of these interfaces. Per best practices, I also mitred the butt-joints between boards on each course to prevent storm water penetration at the joint. Because of the needed tolerances, I generally did not rely on a tape measure and instead would cut one end’s mitre, then put plank in place – mark, and cut the other end’s mitre. I love the finished look, but it added up to thousand’s of hours for the whole dwelling.
Finally: Aug 2019 was the first time that I finally took a 2 week vacation after working pretty much 7 days a week for 7 years other than when I was down with illness, injury, appointments, or exhaustion. This was an important recharge and regroup (although far too short) and we have already booked our Sunshine Coast house rental again for 2020.

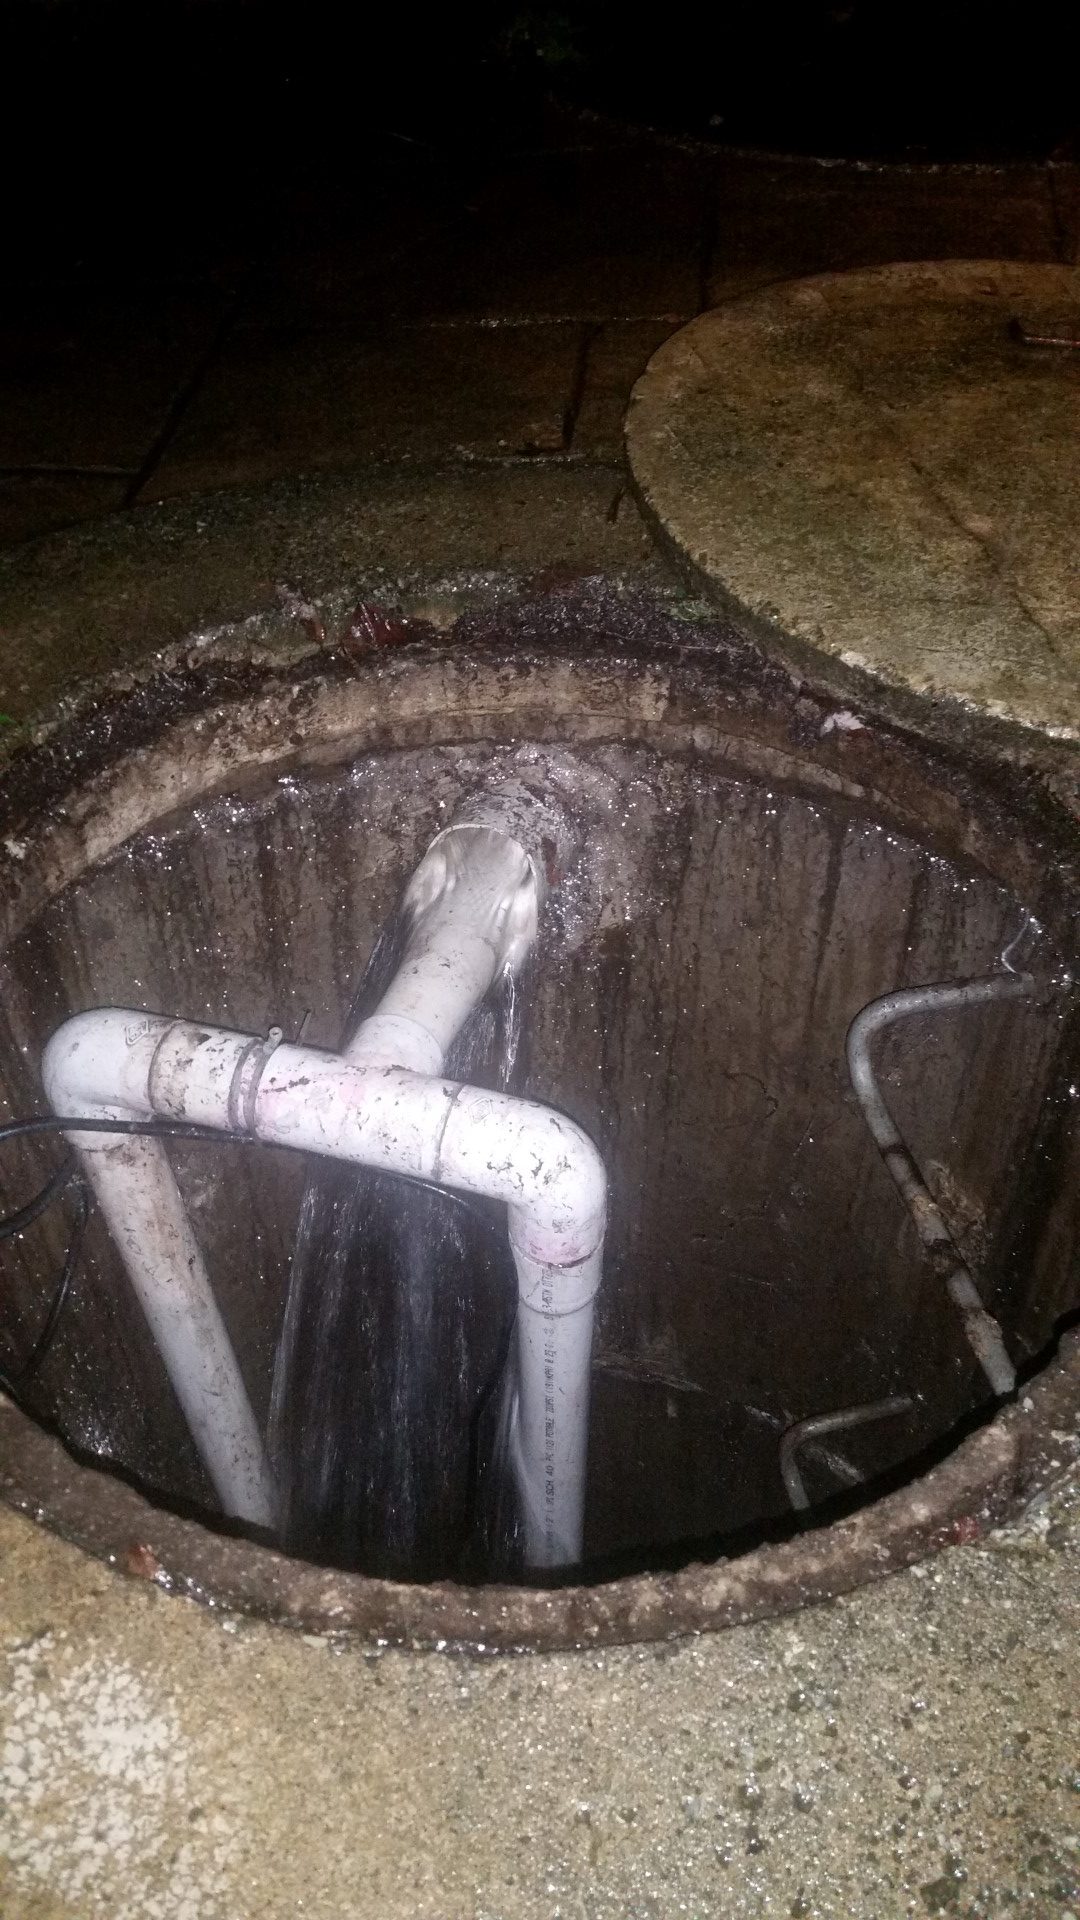
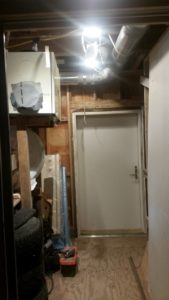
Finally: On Sept 30, I finally completed the inspections on my outside mechanical package (much to the delight of my Municipal plumbing inspector who had extended my permit MANY times). This included the ground water 1000 gal storage cistern and municipal storm sewer connection completed on Aug 14/2018, the dwelling water service and sewage connection completed March 20 (allowing me to finally get rid of construction toilet and install a ‘real’ toilet inside), and then finally installing my Duplex ground water pumping station this last September. This is significant milestone because for the first time since the start of construction, I would not be relying on cheap Canadian Tire sump pump to keep the basement from flooding. All I need now is the electrical backup generator and this system will be foolproof.
Ironically, as I was writing this post last night, the house we currently are renting the basement of across the street, had a storm water emergency. What you are seeing in this photo below is the water backing up from the shallow sump, that is supposed to gravity drain to the street storm sewer, back up into the deep well sump. This was preventing the deep well sump pumps from keeping up with the huge storm water loads we had last night, and was setting off the house alarm. It looks like the pipe between the shallow sump and the road sewer is plugged and there was nowhere for the pumped-up water to go. I was able to get my two old Canadian Tire sump pumps and connect them temporarily to a garden hose for one and a 1″ pvc line for the other, and pump the water out to the street’s surface. A very wet two hours later and we had the water down to safe levels, and hopefully will be able to maintain this till tomorrow when the owner can get someone out to investigate the drain pipe blockage (thankfully the rain stopped and the flow should gradually decrease). I guess those Canadian Tire pumps wanted one last hoorah!
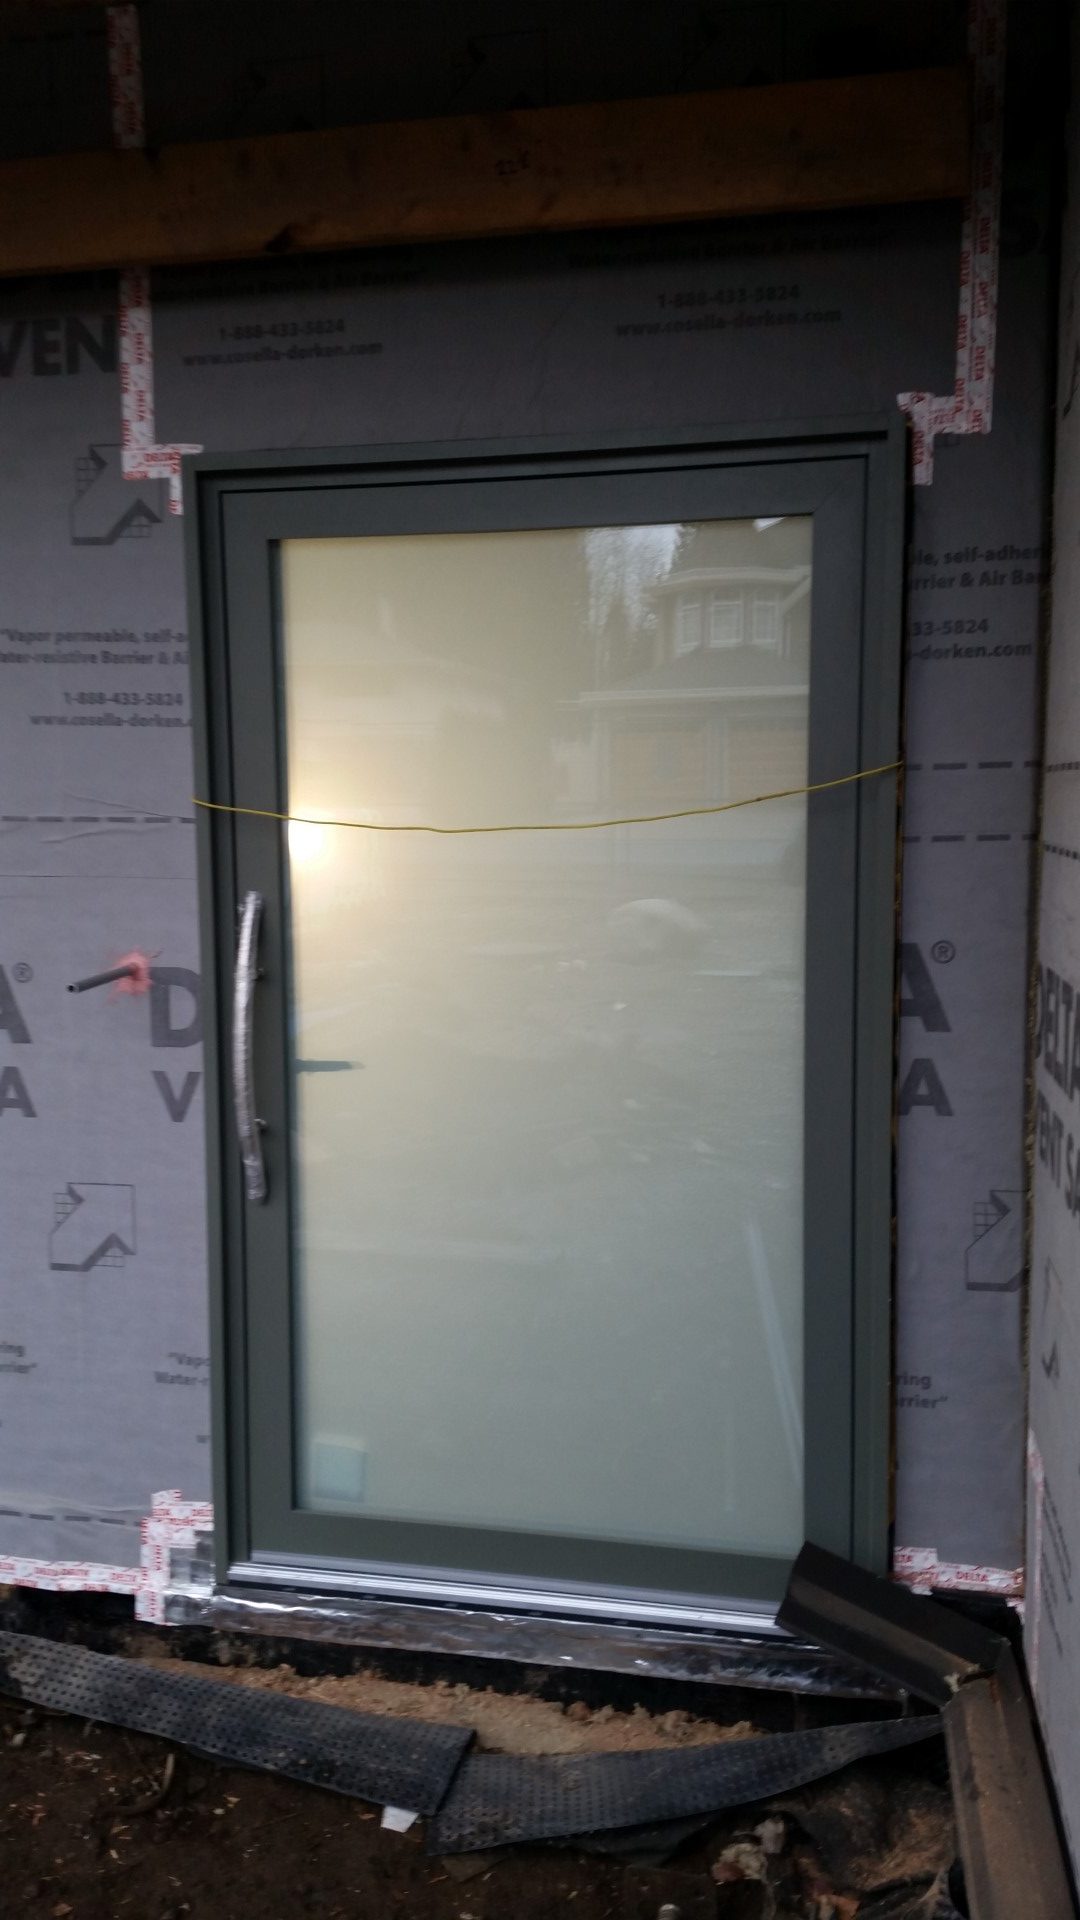
Finally: On Dec 5, I finally installed a front guest entry door! This ended a long and drawn out multi-year hunt for an attractive, yet still reasonably energy efficient, front entrance door that was reasonably affordable. I had been looking for a front entrance door pretty much since the beginning of the build in 2014. My default position prior to construction was that I was going to build a insulated door on site, but due to the delays in starting the project, code changes introduced made building your own door a lot more regulated and expensive.
I started sending out enquiries in Sept 2017 and was not liking what I was seeing. Locally made, the only energy efficient doors were made with opaque fibreglass panels, that quite frankly were either boring or ugly. I initially was looking for a naturally finished vertical grain fir look, but these do not exist higher than about R3. So I started to look at more exotic options including Passive House certified doors. For ZOLA, I was looking at a minimum order value of $40K USD! This was more than I had spent on my entire window package!! EuroLine Optimum 90 started at around $17,500. OptiWin came in around $12K. Hammer and Hand (the most energy efficient and attractive option) started at around $17K USD. I was just buying a door, not a car!! At these prices, there would never be a payback based on energy saved.
So I started again down the journey of building my own custom door with the help of a local door shop that makes custom artisan wood entry doors. They had expressed interest in a energy efficient design, but it was clear after a lot of hours were invested in the process, that they were too far away in knowledge to reach this goal (there sills did not even have air seals). Fortunately Cascadia Windows and Doors came to my rescue with a custom designed door. I will provide more details on this attractive and cost effective door in the update.
Finally: On Dec 12, I finally installed the last of the exterior ROCKWOOL insulation including the garage walls shared with the main dwelling.
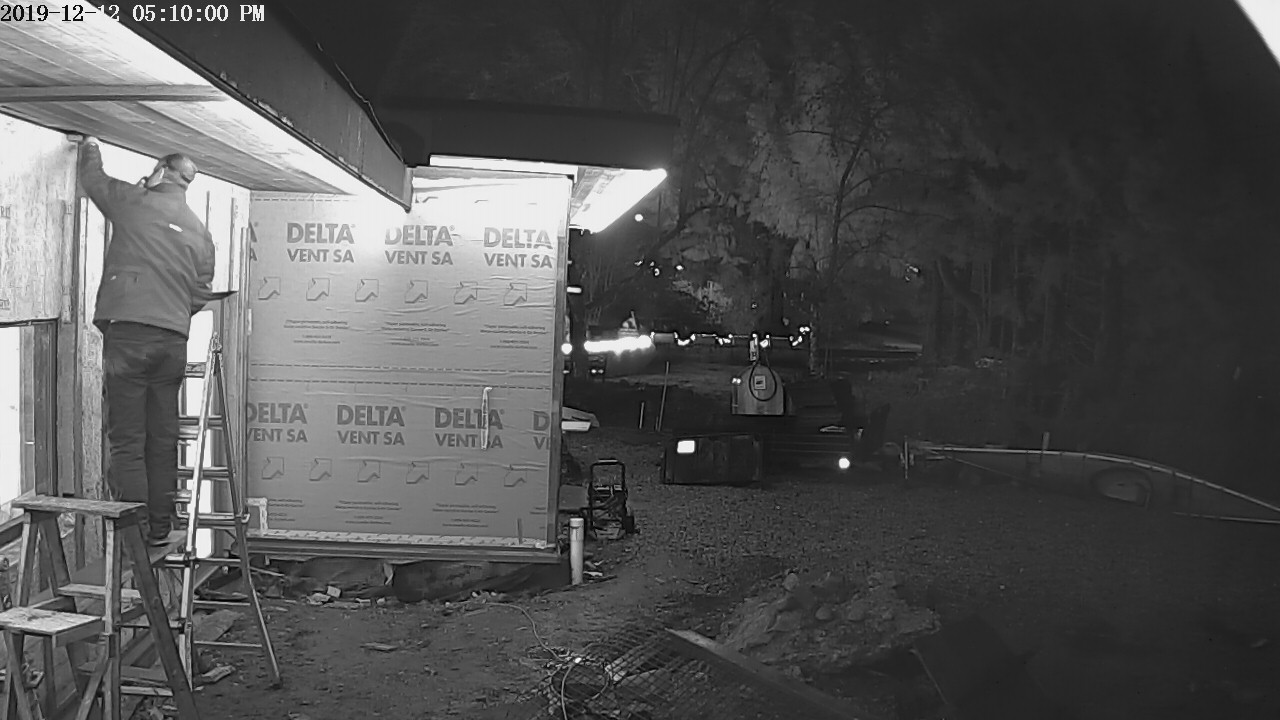
I first started this exterior insulation on Sept 27, 2017!!! only to be stopped on Oct 11, 2017 by the local Municipality because the were not comfortable with this advanced construction entailed in my design and did not formally recognize the Provincially published prescriptive guide Illustrated Guide – R22+ Effective Walls in Residential Construction in B.C This setback took months to get sorted out and cost me thousands of extra dollars.
In the end guess what needed to be changed – NOTHING! Two different top firm’s building envelope engineers were completely happy with my design and workmanship and felt it definitely met best practice and then some. So it feels incredible to finally get this milestone behind me, and the resultant itch and lung irritation induced by working around and cutting the material for so many months. It is actually somewhat bearable inside now with only a small 15A electric oil filled heater inside (stays at around 10-12ºC even when freezing outside).
Finally: On Dec 18, I finally had a clear direction for both my space conditioning (heating and cooling), AND potable hot water generation, after successfully defending my decision to use the Hybrid Water Heater on a forum I belonged to. I was able to show that the payback for this device (including the extra heat in the room needed to offset its cooling) is expected to be under 3 years.
The house had been designed around a Air to Water heat pump technology. Originally, it was going to be the Altherma, but Daikin pulled it from North America in 2017 due to poor sales. I was then steered in the direction of the Solstice SE SpacePak system by some industry greats, but careful analysis by my HVAC consultant in March 2019 indicated that the system would not be suitable for creating domestic hot water (SpacePak’s own engineer recommended against it).
This left a mad scramble as the dwelling had already been designed around this technology, and as the dwelling envelope was essentially complete in the area around the HVAC room, there was no opportunity to rough-in a low temp high efficiency combustion exhaust.
Since I first started designing the system in Oct 2017 (mis-start determining heat loss on room by room basis with a vendor who clearly was not up to my standards) till now, I have put 190 hours into research and planning the system. I now have an accurate heat loss and gain calculation on a room by room basis and a resultant hydronic panel layout thanks to LoopCAD. I have selected a indoor Heat Pump Hybrid Water Heater for our domestic hot water loads (most likely Rheem). For the space conditioning system, we will use a 3-Ton outdoor heat pump (possibly Goodman) pared with ThermAtlantic’s DX2W indoor unit.
Benoit Maneckjee, ThermAtlantic President, has been extremely helpful working through the technical information associated with various heating strategies. We tried, for a while, to look at creating the domestic hot water using an outdoor heat pump, but the max temperatures created by these pumps are just not conducive to creating domestic hot water (min storage requirement is 140ºF and heat pumps typically have a max production of 120ºF).
They do work great, however, for low water temp heating in high performance dwellings. My designed heating water temp being fed to the panels on the coldest of days is only 85ºF (to meet design heating load of only 18K Btu/hr for a 4800ft2 dwelling!) and my cooling water temperature fed to the panels on the hottest days of the year will only be 66ºF to meet the design cooling load of approx. 20K Btu/hr ( cooling loads are harder to define as program defaults do not anticipate best practice design like air tight homes with no infiltration and fixed solar shades blocking majority of summer solar gain, so I expect my actual gain will be less than the program’s estimate). Benoit calculated my estimated annual heating cost at only $445! Since using electricity to create heat, while greener in BC, is more expensive than gas, this low annual cost is fantastic.
The final piece of the puzzle was figuring out the hot water generation via the Hybrid Water heater. Its delayed adoption by me was caused by a misread on one of the equipment spec sheets early in the process. Instead of stating the minimum room size was 500 CUBIC feet, I thought it read SQUARE feet. As I did not have a room 500ft2 in the basement I could locate the heater, it would have to be placed in the main HVAC area that is open to the rest of the dwelling. But the noise created by these heat pumps would be far too loud to accept and I had abandoned the idea. It was not till I was absolutely desperate for a solution other than a electric resistance water heater, that I re-read the spec and realized my error. This unit will now be put in the ‘bunker’ I have under the garage created by making the garage floor slab a suspended slab and excavating below. This room is 100% isolated from the rest of the dwelling with an air and insulation barrier, so the heat pump’s operation should not disturb the dwelling occupants in any manner.
Finally: On Dec 30, I finally finished designing my lighting plan and electrical system and will send my requirements for the distribution panel off to Leviton, who may be interested in partially sponsoring their ‘Smart’ Load Centre.
The system planning was a lot more involved than I anticipated. We will primarily light the dwelling with fixtures like these recessed Wafer Style LED’s (and NO we will not be penetrating our ceiling air barrier to install, they will be installed into a service race way below the barrier). I have over 200 fixtures planned (allowing for various light levels in rooms), and at full intensity (most will be dimmable), the total watt draw will only be 3960 watts (the equivalent of only 40 – 100W bulbs). This includes some heavily lit areas like my two workshops and garage work bench that together account for 900 of these watts.
In reality, the draw will be much lower as we will seldom have circuits at max intensity (will probably link some key circuits to light intensity sensor, to automatically dim on days with adequate natural light). The lights are designed so that we can have a more even gentler light vs brighter individual lights.
The surprising effort surrounded finding good guidance on the lumens needed in a room for various room types. Many of the formulas found online are based on the old incandescent lighting and just not appropriate for modern lighting and modern homes. The days of a single 100W or double 60W light fixture installed in the centre of a room are happily long gone!
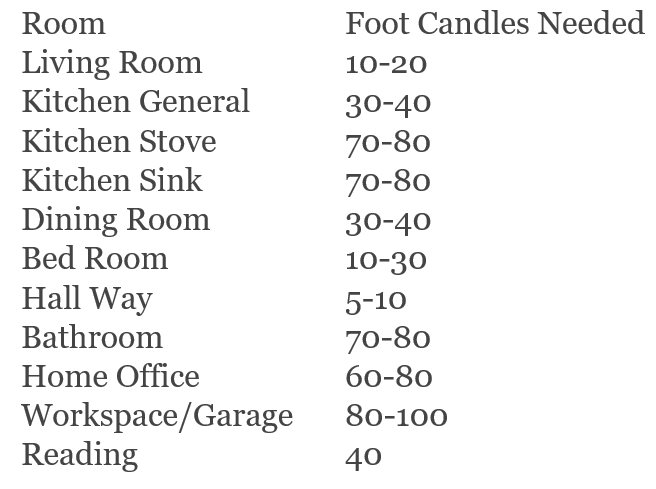
In the end, I relied on the following table to determine the level of lighting needed per room which provides the amount of Foot Candles recommended per square foot based on room or area use.
I converted the foot candles to lumens using on online utility and then confirmed these lighting levels by installing samples, provided by Green Canada LED (Thank-you!), in my mud room to ensure it was the kind and intensity of light that we were after.
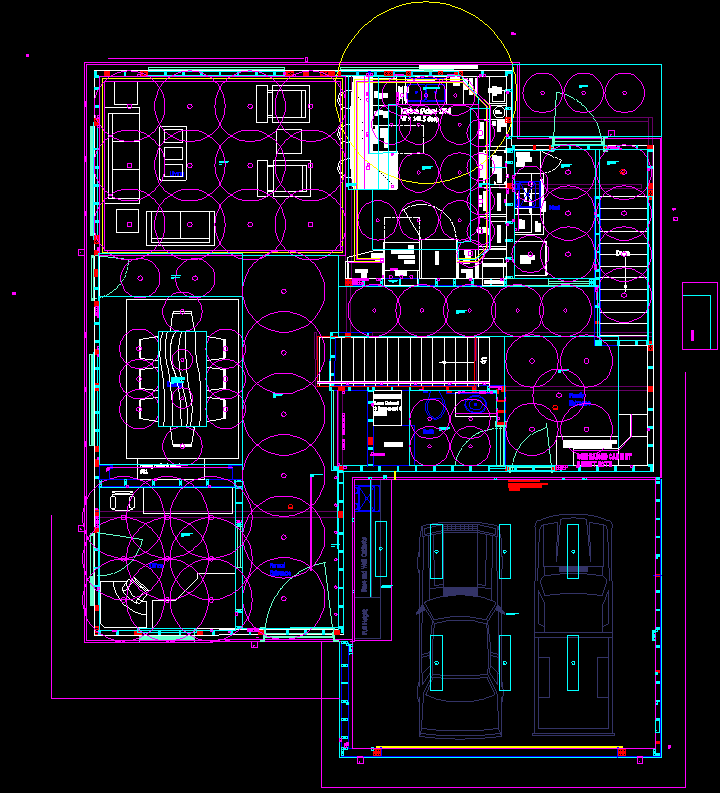
The following images shows some of my design work for the first floor, showing the anticipated lighting patterns of the fixtures and needed lumens for the rooms. The yellow circle was the radius requiring GFCI receptacles around the kitchen sink. The detailed calculations were required because the old rule that you can only have 12 fixtures on a single 15A circuit no longer is in effect if using wired in LED fixtures with integral emitters. Now the circuit can have as many light fixtures as can be serviced with 12 amps (1440 watts). At 9 watts or less a fixture, this is a LOT of fixtures allowed on one circuit.

With the lighting plan completed, I was then able to determine the overall electrical plan with the goal of squeezing the bulk of the system into one 66 circuit load panel. This was aided by the fact that the two workshop sub panels will be fed by a load shedding device like these magnetic latching relays, that will drop these loads when on generator supply so that the generator cannot be overloaded. This freed up one 2-Pole slot in the panel. I will also feed the dryer and future high-amp car charger from the sub-panel in the metal work shop, as these too will need to be dropped when on gen power, but more importantly, will themselves share a circuit using something like the Load Miser, in order to not exceed the dwellings electrical supply of 200Amps. This freed up two more 2-Pole spots in the panel. In the end, I have 5 spare spots including the two mandatory ones.

I do not mind stating, I am extremely satisfied to see this year in the rear-view mirror. I have every intention of ensuring that by our 2020 vacation, the dwelling will be complete to a level that will allow occupation. This project has gone on long enough, and while I am satisfied with the outcome and the costs to date (including our holding costs like rent and project financing) showing this was still a financial success, the 10,054 hours I have contributed to date on the build are wearing on me. I am happy to start 2020 with the more unpleasant tasks of the build behind me, and things like electrical and plumbing, that I thoroughly enjoy, in my view ahead.
Going forward, I will also once again endeavour to be more diligent in my updates to you, maybe even going as far as attempting to issue weekly weekend updates every Sunday ??? Lets see how we make out.
As always – thanks for visiting and Happy New Year!